Note: There is an updated version of this article, which applies to the next generation of TimeXtender.
Installation
To install and configure the ODX Server, you will need the following:
- The ODX Server installation package. Can be downloaded from the support site at
support.timextender.com - The client secret that is used to connect the ODX server to the cloud environment. Can be found in the TimeXtender Portal at portal.timextender.com/odx
- A user account for running the ODX server service if you need to connect to SQL Servers using Active Directory authentication. The user account needs to have the appropriate access on these servers.
When these prerequisites are met, you are ready install the ODX server.
Installing and Configuring the ODX Server Service
To install and configure the ODX Server, follow the steps below.
- If you are upgrading to a new version of the ODX, shut down the old server service.
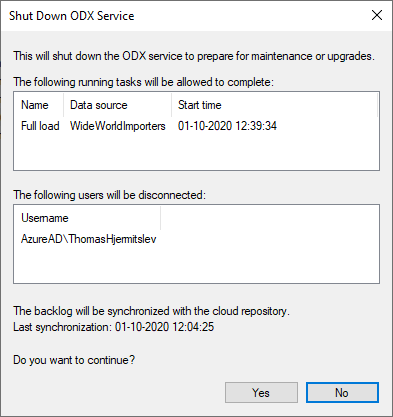
- Open TimeXtender, right click the ODX and click Shut Down ODX Service...

- Click Yes to confirm.
- Uninstall the ODX Server.
- Open TimeXtender, right click the ODX and click Shut Down ODX Service...
- Run the installation package on the server. This will install the ODX Server Windows service.
- When the installation package has completed, the ODX Server Configuration wizard will open to help you configure the server and set up and start the Windows service. Follow the steps of the wizard to complete the configuration.
Note: If you upgrading the ODX and connecting existing ODX project, you will be asked if you want to take over the lock. Information about the ODX that currently has the lock will be displayed. Use this to confirm that it is safe to take over the lock.
If you need to reconfigure the ODX Server, you can start the wizard from the ODX Server's installation folder, which defaults to C:\Program Files\TimeXtender\ODX Server [version]\.
Connecting to the ODX Server
Once your ODX server is set up and running, you can connect to it from TimeXtender to manage it or use data from it.
To connect to an ODX server, follow the steps below.
- From the Tools menu, click Options, then click the ODX Server tab in the window that appears.
- In the Server box, enter the ODX server's address.
- In the Port box, enter the port number if it is different from the default.
- In the Password box, enter the password for managing the ODX.
Note: The ODX server accepts two different passwords, that are added during the initial configuration. The 'admin' password allows you to do management tasks such as adding data sources as well as copying data from the ODX. The 'user' password only allows you to copy data from the ODX. - (Optional) Set you preferred timeouts for opening and closing connection to the ODX as well as for sending and receiving data under Timeouts.
- Click OK. The ODX server is now listed in the Solution Explorer.
To browse the tables in the ODX data storage
- double-click the ODX in the Solution Explorer
To make changes to the ODX
- right click the ODX in the Solution Explorer and click Manage ODX
Note: The ODX server you add by following the steps above is your primary ODX server. If you open a project that uses data from another ODX server, that server will be displayed in the Solution Explorer as a secondary ODX server. It has a blue/gray icon instead of the orange/gray icon of the primary ODX.
0 Comments