Data Storage
All data in the ODX is stored in the data storage. There is only one data storage per ODX, which can be on Azure Data Lake Storage Gen2 or a SQL Server database (on-prem on in Azure).
You will need to delete the existing storage to switch storage types. Deleting a data storage from the ODX Server does not delete the actual data in the data lake or on the SQL Server.
In general , the data storage "never forgets". No data is deleted from the storage unless you run storage management tasks (or delete it manually).
Browsing Tables in a Data Storage
Browsing the content of your data storage and selecting the tables you want to move into a data warehouse uses the same interface in TimeXtender.

To browse the tables in the ODX data storage
- double-click the ODX in the Solution Explorer
Since you data storage is likely to have many more tables that can be listed in the application in a useful way, no tables are listed initially. Use the search functionality to narrow the list of results to the tables you are interested in.
To search for tables across the storage, follow the steps below.
- In the Table box, type the name, or part of a name, of the table. Leave the field blank to match all tables.
- In the Schema box, type the name, or part of the name, of the schema you are interested in. Leave the field blank to match all schemas.
- In the Data Sources list, select all the data sources you want to search.
- Click Search
Warning: Large search results can make the UI unresponsive. For this reason, the list of results is limited to 10000 items. Since this issue is tied to machine performance, you may find that the UI becomes unresponsive with far fewer results.
When you select at table, the Table Information panel in the right-hand side of the UI will show you information about the table. If your storage is in Azure Data Lake, the information includes the number of column, the number files used for storing the table and the total file size. For SQL Server-based storages you can see the number of columns and rows. For both types of storage, the time of last execution is displayed.
Adding a Azure Data Lake Gen2 Data Storage
To add an Azure Data Lake Gen2 data storage , follow the steps below.
- Open you ODX server in a tab and, right click the aptly named Right click to add Data Storage node and click Add Azure Data Lake Gen2 Data Storage...
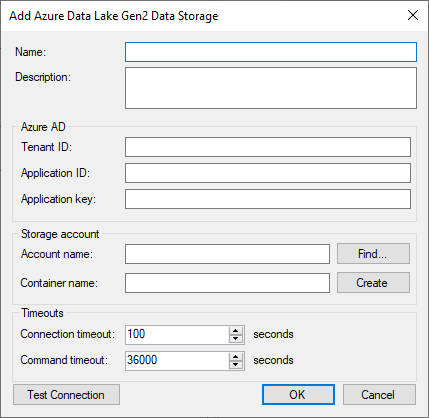
- In the Name box, type the name you want to use for the storage.
- (Optional) In the Description box, type a description of the data storage.
- In the Tenant ID box, enter the tenant ID GUID from Azure.
- In the Application ID box, enter the application ID GUID from Azure.
- In the Application key box, enter the application key from Azure.
- In the Account name box, enter the name of the storage account you want to use. Click Find... to filter and browse the accounts on your Azure tenant to find the account.
- In the Container name box, type the name of the container you want to use. Type the name and click Create to create a new container.
- (Optional) In the Connection timeout box, enter a timeout for the commands you run on the storage.
- (Optional) In the Command timeout box, enter a timeout for connecting to the storage.
- Click OK to add the storage.
Adding A SQL Server Data Storage
To add a SQL Server data storage, follow the steps below.
- Open you ODX server in a tab and, right click the aptly named Right click to add Data Storage node and click Add SQL Server Data Storage...
- In the Name box, type the name you want to use for the storage.
- (Optional) In the Description box, type a description of the data storage.
- In the Server box, enter the address of the SQL Server you will be using.
- In the Authentication list, click the mode of authentication you want to use. You have the following options:
- Windows Authentication: Use the logged-in Windows user's credentials for authentication.
- SQL Server Authentication: Use a login set up on the SQL Server. Enter the username and password in the corresponding fields.
- Azure AD Password Authentication: Use Azure AD credentials from a domain that is not federated with Azure AD. Enter the username and password in the corresponding fields.
- Azure AD Integrated Authentication: Use the logged-in Windows user's credentials for authentication, provided that he is logged in using Azure AD credentials from a domain that is federated with Azure AD.
- In the Database box, type the name of the database.
If you want to create a new database, make sure the authentication options below are correct and then type a name for the database and click Create. The Create Database window opens.
- In the Collation list, click on the collation you want to use.
- In the Recovery model list, click on the recovery model you want the database to use. Then click OK.
- (Optional) In the Command timeout box, enter a timeout for the commands you run on the storage.
- (Optional) In the Connection timeout box, enter a timeout for connecting to the storage.
- If you plan to use Azure AD users in your security roles, select Use Azure settings and enter the required options:
- In the Tenant ID box, enter the tenant ID GUID from Azure.
- In the Application ID box, enter the application ID GUID from Azure.
- In the Application key box, enter the application key from Azure.
- (Optional) Enter any addition connections settings in the Additional connection properties box.
- Click OK to add the storage.
0 Comments