Security
In the semantic layer, you can setup access to data on the row and model level. In other words, you can decide who has access to a model and what data in the model they have access to. For instance, a sales team could have access to a model while the individual sales people has access to data on the specific customers they work with.
To setup access on the model level, you add a role and map it to an endpoint. To refine the access to the row level, you add a row-level security setup and map this to one or more roles.
Adding a Role
To add a role, follow the steps below.
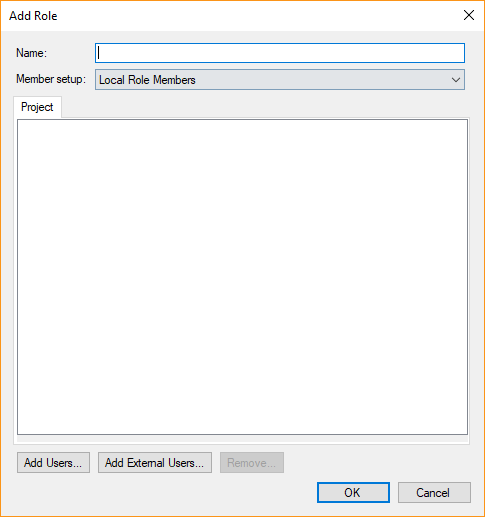
- Navigate to the relevant model, right click Roles and click Add Role. The Add Role window appears.

- Type a name for the role in the Name box.
- Click Add AD Users... to add users from a local AD. The standard Select Users and Groups window appears.
- Click Add External Users... to add an external user, e.g. an Azure AD user. The Add External Users window appears. Type the users email address and click Add to add him to the role.
- Click OK to add the role.
Mapping a Role to an Endpoint
Mapping a role to an endpoint restricts access to data on that endpoint to members of the role.
To map a role to an endpoint
- Right-click the role, click Endpoints and click the endpoint you want to map the role to
- OR -
Drag the role to the endpoint
Adding a Row-Level Security Setup
Note: This setting applies to SSAS Tabular and Qlik endpoints only.
There are different ways of setting up row-level security depending on the endpoint(s) you are targeting and how security is handled in your organization. See How to Setup Up Row-level Security below for more information.
Two types of row-level security setups are available: Manual, where you map values and members in the GUI and dynamic, where the mappings are read from a table in the data warehouse.
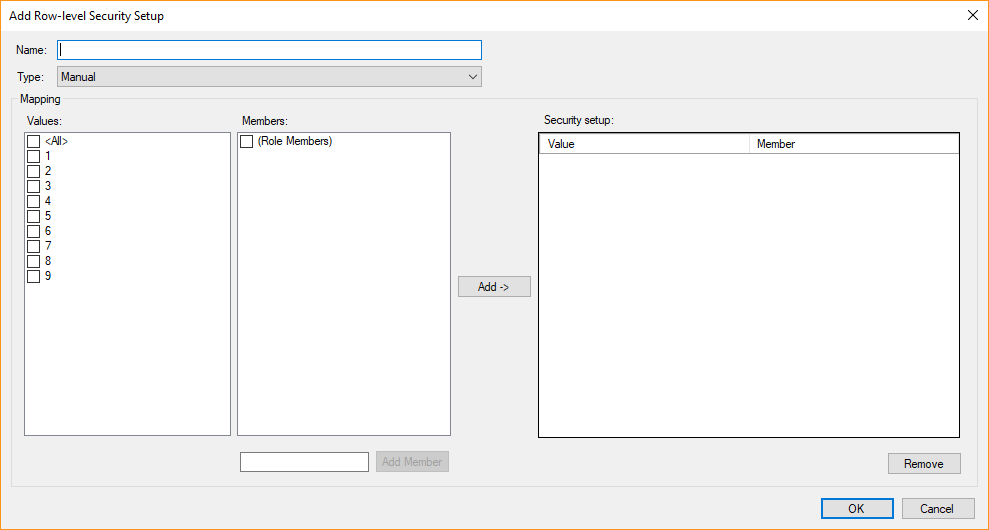
To add a manual row-level security setup, follow the steps below.
- Right click a field and click Add Row-level Security Setup.

- Type a name for the setup in the Name box.
- Select one or more row values in the Values list and one or more members in the Members list and click Add > to map values and members. The "(Role members)" member maps the values to the members of the roles that are mapped to the setup.
- Enter a username in the text box and click Add Member to add that user or group to the list of members. Usernames added this way will be deployed with the roles that are mapped to the setup.
Note: Members added this way are deployed to Qlik endpoints only.
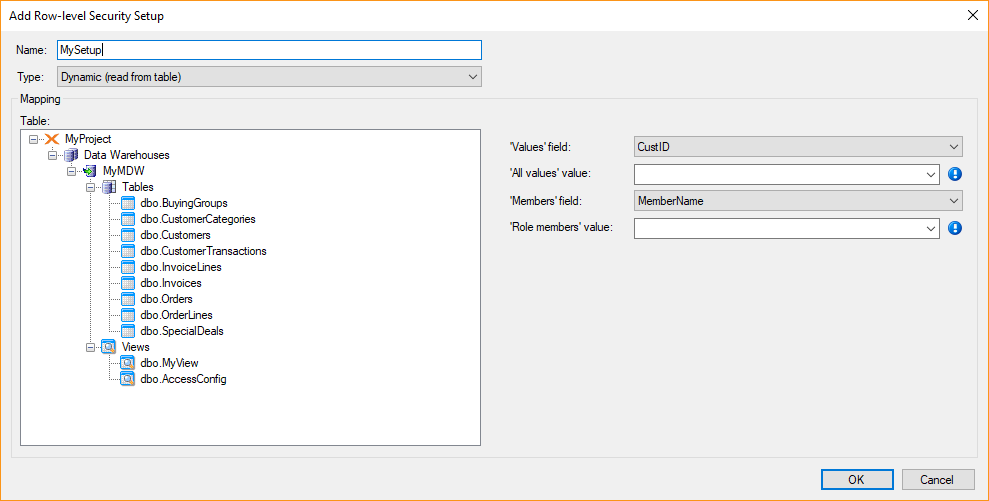
To add a dynamic row-level security setup, follow the steps below.
- Right click a field and click Add Row-level Security Setup.
- In the Type list, click Dynamic.

- In the Table list, click the table or view that contains the mapping you want to read.
- In the 'Values' field list, click the column that contains the values, e.g. customer IDs.
- In the 'All values' value box, click or type the value that TimeXtender should take to mean all values, i.e. members mapped to this value has access to every row.
- In the 'Members' field list, click the column that contains the members.
- In the 'Role members' value box, click or type the value TimeXtender should interpret as any member of a role mapped to the row-level security setup.
- Click OK to save the setup.
Mapping a Row-level Security Setup to a Role
Mapping a row-level security setup to a role restricts access to data on that endpoint according to the mapping of row values and members in the setup.
To map a row-level setup to a role
- Right-click the row-level security setup, click Roles and click the role you want to map the setup to
- OR -
Drag the row-level security setup to the role
Setting Up Row-level Security
You can add as many or as few roles and row-level security setups as you like and each role can be mapped to any number of row-level security setups and the other way around. This gives you a lot of flexibility to set up row-level security in a way that makes sense in your particular situation.
There are two basic approaches you can use:
- One role and one setup:
- Add one role. If you target SSAS Tabular, all users and groups that you later add to the security setup must be members to have access. If you only target Qlik, the role can be empty since it only serves as a link between the security setup and the endpoint.
- Add one setup. Add the users and groups as members in the setup and map the relevant values to the members you have added.
- Map the setup to the role and the role to the endpoint(s).
- This works well if you have the relevant groups in Active Directory and can manage membership from there.
- Many roles and setups:
- Add a role for each user or group that should have access to a specific subset of data.
- Add a setup for each of the roles. Map the relevant values to the "(Role Member)".
- Map the setups to the roles and the roles to the endpoint(s).
- This works well if you want to use roles as groups in the semantic layer.
As hinted above, Analysis Services and Qlik handles security differently:
- On Analysis Services, access is granted to a role and TimeXtender uses DAX scripting to give users and groups access on the row level.
- Qlik does not have roles, so all access is granted on the users/groups-level. For Qlik, roles in the semantic layer is simply an ad hoc collection of users and groups that have access to the same data.
0 Comments