Note: There is an updated version of this article, which applies to the next generation of TimeXtender.
Selecting, Copying and Relating Tables
At its core, a TimeXtender project is about copying data from one place to another. Often, you simply copy data from a few data sources to a data warehouse via a staging database in a business unit. You can also consolidate data from multiple business units in one data warehouse or have multiple data warehouses and copy data between those.
Once the data has been copied, you can set up relations between the tables. Among other things, specifying the relations allows TimeXtender to do a referential integrity check during execution of the project.
Copying Tables From a Data Source to a Staging Database
Note: If you use the ODX Server, data will be copied directly from the ODX Server to a data warehouse. Consequently, you won't be using business units, including the staging database and the data sources that make up a business unit, and can safely ignore anything about staging databases in this chapter.
To get data into your staging database, you first have to connect at least one data source or adapter data source. See Connecting to Data Sources for more information.
Selecting Tables from a data source
To add tables to the staging database, you select the tables and fields that you want to extract from the data source.
- Right click the data source and click Read objects from data source. This will get content for the list of tables in the Data Selection pane in the right-hand side of the window.

- In the bottom of the pane, you will find filter and sorting options:
- To filter the list by specific terms, type a word in the box and click Filter. You can add more than one filter term. The terms you have entered are added to the Current filters list. Click Reset to remove the current filter.
Note: You can filter on both table and column names. With large data sources, loading the meta data to enable filtering on columns names can be time consuming and memory intensive. If you experience issues with this, you can disable column caching. For more information, see Column Cache. - In the Show list, you have the following filter options:
- All tables and fields: No filter is applied.
- Selected tables and fields: Only the tables and fields already selected from the data source are displayed. This is useful if you need to find an unselected a table or field.
- Unselected tables and fields: Only the tables and fields that are not already selected from the data source are displayed.
- Only objects in project perspective: Only the tables included in the currently active project perspective are displayed.
- Under Sorting and grouping, you have the following options:
- Sort alphabetically: Sort the tables in alphabetical order.
- Group alphabetically: Displays the tables in groups based on the number of characters entered in Number of characters to group on.
- Divide into groups: Divides the tables into groups with the number of tables by group based on the number entered in Tables per group.
- Select Include schema in table name to display schema name along with the table names.
- In the Naming list, you can choose what name you want to show for the tables. You have the following options:
- Display name
- Database name
- To filter the list by specific terms, type a word in the box and click Filter. You can add more than one filter term. The terms you have entered are added to the Current filters list. Click Reset to remove the current filter.
- Select the individual tables and fields that you want to copy from the data source into the staging database or click Select all to select all the tables in the source. For each table you select, a table is added to Tables under the staging database.
- Right click on the staging database and click Deploy and Execute to create the table structure in the staging database and copy the data over.
Selecting More Tables from a data source
The Select Tables and Fields wizard gives you an alternative way to select more data from a data source. It is especially useful when you have a lot of tables and fields selected on a data source and need to add even more. Since the wizard only allows you to add tables and fields, you can't unselect a table or a field by accident. The select tables and fields from a data source with the wizard, follow the steps below.
- Right click the data source and click Read Objects from Data Source.
- Right click the data source, click Automate and click Select Tables and Fields. The wizard appears.

In the Available tables list, double-click the tables you want to select. You can also click a table and then click Add to add an individual table. Use the filter below the list to filter the list on table name. To add all visible tables, click Add all. - Click Next.

In the Available fields list, double-click the fields you want to select from the data source. You can also click a field and then click Add to add an individual field.
The tables in the Available fields list that have at least one field selected will be shown in bold.
In the Included fields list, any fields that are already selected on the tables you selected in the previous step are listed in gray. You cannot unselected fields on this page, only add new ones. - Click Next.

Your selections are listed for you to review. Click Previous to go back to an earlier page and adjust the selections there or click Finish to apply the changes if they are correct. - Right click on the staging database and click Deploy and Execute to create the table structure in the staging database and copy the data over.
Copying Tables from an ODX to a Data Warehouse
To use data from an ODX in your TimeXtender project, you first need to connect to an ODX server. You can then drag tables from the ODX to a data warehouse as explained below. Naturally, this requires a running and correctly configured ODX server connected to data sources and data storages. For more information on setting up an ODX server, see ODX.
Synchronize Objects with an ODX Server
Data sources change and these changes will obviously propagate to the ODX data storage. For that reason, you should occasionally synchronize the ODX with your project when you have selected data. When TimeXtender synchronizes objects with an ODX server, the list of tables on the ODX server known by the project are compared to the current list of tables. If there are differences, TimeXtender will show you a list.
To synchronize objects
- Right click the ODX server and click Synchronize Objects.
Selecting Tables from the ODX Server
Selecting tables from the ODX server and moving them to a data warehouse is one operation when you use the ODX. Since the ODX is designed for large amounts of tables and views, you search for the tables you want to copy as opposed to selecting them from a list of all available tables.
To copy tables from an ODX server to a data warehouse, follow the steps below.
- In the Solution Explorer, double-click the ODX server. The ODX opens in a tab.
- In the tab you can search for the tables and views you want to copy. In the Schema and Tables boxes, type the string you want to compare with the names of tables and views in the ODX.
- In the Data source list, select the sources you want to search.
- Click Search to search the ODX data storage and add the matching tables to the Results list below.
- Drag tables from the results list to the Tables node on a data warehouse to add them to the data warehouse. Hold Shift or CTRL to select multiple tables to drag.
When you drag and drop a single table, each operation has a default action and some secondary actions. The default action will be used if you drag and drop using the primary mouse button, while the secondary actions will be available in a shortcut menu if you use the secondary mouse button to drag and drop. The available actions are as follows:
- Add New Table (default): Adds the table as a new table in the data warehouse. Default when no table in the data warehouse has the same name as the table being dragged.
- Synchronize on Table Name (default): Synchronizes the table with an existing table in the data warehouse with the same name. New fields from the new table are added and already existing fields are mapped to the fields from the new table. Default when a table in the data warehouse has the same name as the table being dragged.
- Add New Table with Field Selection: Adds the table with the fields you select in a window that opens.
- Synchronize with Other Table: Synchronizes the table with an existing table in the data warehouse chosen by you.
When you drag and drop multiple tables, TimeXtender will first try to synchronize each table on table name. If no table with the same name exists in the data warehouse, the table is added as a new table. - Repeat step 3-7 until you have copied all the tables and views you want to copy.
Copying Tables between Databases
Once the data has been selected from the source, moving tables between databases works in the same way no matter if it is between a staging database and a data warehouses or between two data warehouses. To TimeXtender, they are all just databases.
In this context, the difference between a staging database and a data warehouse is that one table in a data warehouse can get data from multiple source tables or views. This makes it possible to consolidate multiple tables or views from the staging database in the data warehouse. If you copy a table from one data warehouse to another, the copy will have the same mappings as the original.
You can find the mappings between source and destination tables on the fields on the destination table. If you expand a field, the mappings are displayed as "Copy From [schema].[table].[field]".
Copying a table From One Database to Another
To copy a single table from a staging database to a data warehouse or between data warehouses
- Drag the table from Tables under the source database to Tables under the destination data warehouse.
When you drag and drop a single table, there is a default action and some secondary actions. The default action will be used if you drag and drop using the primary mouse button, while the secondary actions will be available in a shortcut menu if you use the secondary mouse button to drag and drop. The available actions are as follows:
- Add New Table (default): Adds the table as a new table in the data warehouse. Default when no table in the data warehouse has the same name as the table being dragged.
- Synchronize on Table Name (default): Synchronizes the table with an existing table in the data warehouse with the same name. New fields from the new table are added and already existing fields are mapped to the fields from the new table. Default when a table in the data warehouse has the same name as the table being dragged.
- Add New Table with Field Selection: Adds the table with the fields you select in a window that opens.
- Synchronize with Other Table: Synchronizes the table with an existing table in the data warehouse chosen by you.
Copying All Tables From One Database to Another
If you need to copy all tables from one database to another, there is an easier way than to copy all tables individually.
To copy all tables from a staging database to a data warehouse or between data warehouses
- Drag Tables from the staging database to Tables under the data warehouse.
TimeXtender will first try to synchronize each table on table name. If no table with the same name exists in the data warehouse, the table is added as a new table.
Mapping a Table to a Table on the Data Warehouse
To map a table from one database to an existing table in another database, follow the steps below:
- Drag a table from the source database to a table in the data warehouse. A menu appears.
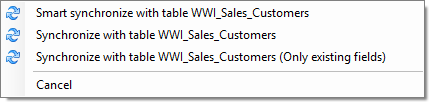
You have the following options: - Smart synchronize with table [table name]: TimeXtender compares the table you have dragged in with the other source tables on the table and add the fields from the source table that matches fields from the other source tables.
- Synchronize with table [table name]: Add the fields of the source table to the destination table. When names are identical, a mapping is added, otherwise a new field is created on the table.
- Synchronize with table [table name] (only existing fields):Map the fields of the source table to existing fields on the destination table with the same name.
Copying a Field to a Table as a New Field
In addition to moving entire tables, you can also copy single fields.
To copy a field from a table in a staging database to a table on a data warehouse or between tables on two data warehouses
- Drag the field from the table in the source database to a table in the data warehouse.
Mapping a Field to a Field
To map a field from a table in a staging database to a table on a data warehouse or from a table in one data warehouse to a table in another data warehouse
- Drag the field from a table in the source database to a field on a table in the data warehouse.
When you map a field, the data type is automatically converted to match the data type of the data warehouse field if necessary.
Table Relations
For TimeXtender to know how tables are related, you have to specify relations. Among other things, the relations between tables you have defined are used for a referential integrity check on execution, for the default join when you create conditional lookup fields and for relating dimensions in an SSAS Multidimensional cube.
Under Relations under each table, you can see the relations that this particular table has to other tables.
Relations are grouped by the foreign table and the relation name defaults to “[foreign table name]_[foreign field name]”.
Each relation contains one or more field relations. On each field relation, the part on the left side of the equals sign is a field on the foreign table, while the part on the right side is a field on the table that has the relation.
Adding a New Relation
To add a new relation to a data warehouse or business unit table, follow the steps below.
- Navigate to the table you want to relate to another table.
- Click on the field you want to base the relation on and then drag and drop the field on a field on another table. Note that the fields must be of the same data type to create a relation.
- TimeXtender will ask you if you want to create a relation. Click on Yes. The relation is created on the table on which you drop the field.
Setting a Default Relation
You can set one of the relations between two tables to be the default relation. A default relation is useful if you have more than one relation between two tables, for instance as join for lookup fields that do not have a specific join set and for auto-relation when you add a dimension to an SSAS Multidimensional cube.
- To set a relation as the default relation, right click the relation and click Set as Default Relation.
Setting the Severity of Violating the Referential Integrity Check
TimeXtender users the relations you have defined to perform a referential integrity check, or foreign key constraint check, when the table is executed. TimeXtender checks the value of any field that are part of a relation to see if the value exists in the related field in the related table. If not, TimeXtender considers the record invalid.
For instance, a Sales Order table might contain a Customer ID field that is related to a Customer ID field in a Customer table. If a specific sales order record contains a Customer ID that is not in the Customer table, TimeXtender considers that record to be invalid.
You can define the severity of the violation on each relation.
To set the severity of a violation on a particular relation
- Right click the relation, click Relation Type and click your preferred type. You have the following options:
- Error: TimeXtender moves the invalid record to the error table. This means data will be missing from the valid instance of the table.
- Error with physical relation: The relation is stored in the database for other database tools to see. The behavior is otherwise the same as error. Note that the table needs to have a primary key and a unique index set. If index automation is disabled on the table, you will have to create the index yourself.
- Warning: TimeXtender copies the invalid record to the warnings table and the valid instance of the table. You will not be missing data from the valid table. However, you might need to handle the violated rule in some way.
- Relation only: TimeXtender ignores any violations of the check.
Constraint Suggestions
In addition to the foreign constraint check, TimeXtender can perform a primary key constraint check on execution. Both checks are based on the relations and primary keys you have added to the project. Sometimes information about the tables’ primary keys and relations can be found in the data source and read by TimeXtender. The Constraint Suggestions wizard surfaces these suggestions and allows you to implement the ones you want to use.
Adding Relations and Primary Keys for Multiple Tables
To use the Constraint Suggestions wizard to add relations and primary keys to all tables in a staging database or data source, follow the steps below.
- Right click the staging database or data source, click Automate and click Add Suggested Constraints. The wizard appears on the page where you can select what fields to include in the primary key on the respective tables.

In the Suggested fields list, double-click the fields you want to use as primary keys. You can also click a field and then click Add to add an individual field. To add all visible fields, click Add all. Use the filter below the list to filter the list on field name. The following wildcards are supported:- %: Any string of zero or more characters.
- _: Any single character.
- [ ]: Any single character within the specified range ([a-f]) or set ([abcdef]).
- [^]: Any single character not within the specified range ([^a-f]) or set ([^abcdef]).
- Click Next. In the Suggested fields list, double-click the fields you want to create a relation from. You can also click a field and then click Add to select an individual field. In the parenthesis after the field name, you can see what table and field the relation will be to. The tables in the Available fields list that have at least one field select will be shown in bold.
- Click Next. Your selections are listed for you to review. Click Previous to go back to an earlier page and adjust the selections there or click Finish to apply the changes if they are correct.
Unused Fields
TimeXtender can display all unused fields in the project. This feature is useful for removing unnecessary objects from the project to decrease clutter and improve performance.
Displaying Unused Fields
To display unused fields
- Right-click the business unit or the data warehouse and click Find Unused Fields. The list of unused fields appear.

In the staging database, the list would show fields that exist but are not:
- Copied to the data warehouse
- Used as a data selection rule
- Used as an incremental selection rule
- Used in a strongly typed custom table
- Used in a SQL snippet
- Used as a conditional lookup in another table
In the data warehouse database, the list would show fields that exist but are not:
- Copied to the SSAS Multidimensional Cubes as measures or dimensions
- Used as a data selection rule
- Used as an incremental selection rule
- Used in a strongly typed custom table
- Used in a SQL snippet
- Used as a conditional lookup in another table

2 Comments