Fields
Most fields in a TimeXtender projects comes from data sources, but you can also add new fields to tables on data warehouse or staging databases. You can add custom fields - simply called "fields" on data warehouse databases - conditional lookup fields, custom hash fields and supernatural keys.
Cloning a field
All fields a data warehouse or staging database can be cloned, no matter if they are brought in from a data source or added later.
To clone a field, follow the steps below.
- Right click the field and click Clone Field. The Clone Field window appears
- In the Name box, enter a name for the field.
- Two options are available:
- Clone structure: The cloned field will be an exact copy of the original field including transformations and validations
- Clone values: The cloned field will be a custom field that gets its value from the original field.
Including fields in the Primary Key
All tables in your project can have a primary key that uniquely identifies every row in the table. The key can consist of one or more fields.
There are multiple advantages to and uses for primary keys:
- TimeXtender can enforce the primary key constraint, i.e. that all the primary keys are unique.
- You avoid duplicate values in your dimensions when you consolidating data from different business units.
To include a field in the primary key for at table
- Right click the field and click Include in Primary Key.
Hiding a Field from the Valid Instance of a Table (Raw-only Fields)
A raw-only field is a field that only exists in the raw instance of the table and not the valid instance. This way, the field won't show up in SSAS Multidimensional cubes, Qlik models and other front-ends that use the valid instance of the table. This is very useful if you have fields one the table with no other purpose than to be part of other fields, e.g. a surrogate key when you do dimensional modeling.
To make a field raw-only
- Right click the field and click Raw-only field.
Tagging A Field
Fields in a data warehouse or staging database can be tagged. The tags used as the basis for project perspectives and for the data impact documentation type.
When you tag fields because you want to create data impact documentation, make sure to tag the fields as "early" as possible, i.e. in the staging database. That way, you will get the journey of the data from source to endpoint captured in the documentation.
Before you can add a tag to fields, you have to add the tag itself.
To add a new tag
- Right click Tags in the Solution Explorer and click Add tag. Name the tag and click OK.
Once you have added one or more tags, you can add the tags to fields.
To add a tag to a field
- Right click the field, click Tags and click on the tag you want to add to the field.
Custom Fields
Custom fields - or just "field" in the data warehouse - is basically an empty shell that you need to add data to through transformations, scripting or data copy. It has many uses - for instance, you can build a model of your data warehouse before bringing data in. Follow the steps below to add a custom field.
- Right click a table and click Add Field/Add Custom Field. The Add Field/Add Custom Fields window appear.
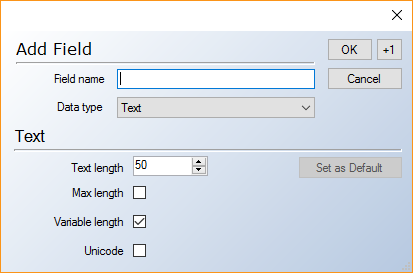
- In the Field name box, type a name for the field.
- In the Data type list, click on the data type you want to use for the field.
- Define the attributes of the selected data type. You have the following options:
Data Type Attribute Description Text Text length The maximum number of characters the field can contain. Max length The field can contain any amount of characters up to a storage size of 2 GB. Variable length The field can be of variable length. Unicode Characters are encoded in Unicode Integer Type The size of the integer: bigint, int, smallint, tinyint. Numeric Numeric precision The number of digits in the field. Numeric scale The number of digits to the right of the decimal point Mantissa bits The precision of the floating point number if floating point is selected. 1-24 bits equals single precision, while 25-53 bits equals double precision. Floating point The number is saved using floating point notation. Binary Length The length of the binary field. Max length The field can contain any amount of characters up to a storage size of 2 GB. - (Optional) If you want to use the same attributes the next time you add a field of the same type, click Set as Default. The default the button is disabled, the current settings are the default settings.
- Click OK to add the field and close the window or +1 to save the field and add another field.
Conditional Lookup Fields
A conditional lookup field gets - looks up - its value from a field in another table - the source table - in the same data warehouse or staging database. One conditional lookup field can look up values on more than one source field. Conditions can be applied to calculate which of the source fields will deliver the value of the conditional lookup field.
Example
Conditional lookup fields have many uses, and the following is just one example of how to use them.
You have two tables, Customers and Orders, and you want to add the CustomerName field from the Customers table (source) to the Orders table (destination). To do this, you add a conditional lookup field on the Orders table that lookups up the value of CustomerName on the Customers table using the CustomerID field, that is available on both tables, as a join.
Later, you get a new CRM system while the old system is still online so users can access legacy data. This means that there are now two tables that could contain the CustomerName value: Customers and NewCustomers. To handle this, you add a new lookup field to the conditional look up field. The new field looks up the CustomerName field in NewCustomers table. Next, you have to add a condition to each lookup field to decide when to use the value from that field. Luckily, the CustomerIDs in the two systems do not overlap, so you can add conditions so that the value is sourced from the old table for any CustomerIDs under 1000, while the new table is the source for the rest.

Adding a Conditional Lookup Field
The easiest way to add a conditional lookup field is to use a drag-and-drop operation.
To add a conditional lookup field
- Drag the field to be looked up from the source table to the destination table. If you drag with the right mouse button to a field on another table, you can select whether to add the conditional lookup field above or below the field being dragged to.
Depending on the existing joins and relations, different options will be available after the drag-and-drop operation.
- If there are no relations between the source and destination tables, and no conditional lookup fields between the two tables that have joins, the Add Join window will appear to let you add a new join. See Adding a Join to a Conditional Lookup Field for more information on adding a join and joins in general.
- If relations or joins exist, a window will appear to let you chose how to proceed:
- Use default relation instead of joins: The conditional lookup field will use the default relation between the two tables as a join. This option is only available if a relation exist between source and destination tables. When a default relation is used as joined, a "read-only" version of the join icon is displayed.
Warning: Use this option with care. The conditional lookup field will fail if you delete all relations between the source and destination tables and might begin to give different values if you change the default relation. - Add new joins: Opens the Add Join window to let you add a new join.
- Copy joins from: Creates joins on the conditional lookup field based on an existing relation or conditional lookup field you select.
- Use default relation instead of joins: The conditional lookup field will use the default relation between the two tables as a join. This option is only available if a relation exist between source and destination tables. When a default relation is used as joined, a "read-only" version of the join icon is displayed.
If you are dragging a field from a history-enabled table, you need conditions to specify for what date you want to look up the record. A window appears to help you set up the conditions. You have the following options:
- Use this field: Select a date field on the destination table. The conditions will specify that the record should be the one valid on that date.
- Use the current record: The condition will be that the record should be the one that is marked as current.
- I will set up any conditions myself: TimeXtender will not set up any conditions.
Next, you can add additional lookup fields or add conditions to your lookup fields.
Adding a Conditional Lookup Field without Drag-and-Drop
While the easiest way to create a conditional lookup field is using a drag-and-drop operation, it can also be done in a more traditional way. To add a conditional lookup field, follow the steps below.
- Right click a table in a staging database or data warehouse and click on Add Conditional Lookup Field.
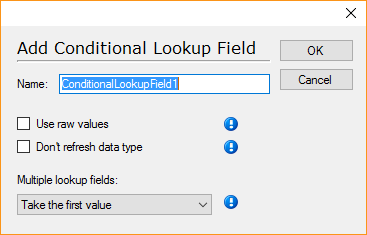
- In the Name field, type a name for the lookup field.
- Select Use raw values to perform the lookup on the raw values of the source table instead of the valid values, i.e. before any transformations or other cleansing tasks are performed. Lookups are always inserted into the raw destination table, and this setting does not affect that.
- Select Don't refresh data type to set the data type of the lookup field manually. Per default, TimeXtender will set the data type of the conditional lookup field to the data type of the source field of the first lookup field. If you enable this option, you can right-click the conditional lookup field, when it has been added, and click Edit Data Type. If your conditional lookup field contains lookup fields with different data types, this option is useful to set a data type that can contain all possible values.
- In the Multiple lookup fields list, select what value is used when a the field contains more than one lookup field. In any case, the lookup fields are evaluated in the same order as they appear in the tree. What happens when there is a match depends on this setting, which can be one of the following:
- Take the first value: The value of the conditional lookup field will be the value of the first lookup field with a condition that evaluates to true.
- Take the first non-empty value: The value of the conditional lookup field will be the value of the first lookup field with a condition that evaluates to true and is not empty.
Adding a Lookup Field to a Conditional Lookup Field
A conditional lookup field contains a lookup field for each source field that is the potential source of the conditional lookup field's value.
To add a lookup field to a cognition lookup field, follow the steps below.
- Expand the conditional lookup field, right-click Lookup Fields and click Add Lookup Field.
- OR -
Drag a field from a table on a data warehouse to Lookup Fields under the conditional lookup field. This pre-fills some of the settings in the Add Lookup Field window that appears.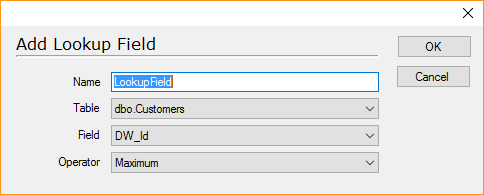
- In the Name field, type a name for the field.
- In the Table list, select the table containing the field you want to use.
- In the Field list, select the field you want to use.
- In the Operator list, specify how to return the values. You have the following options:
- Top: Returns the value from the first record that matches the join criteria. When you select this operator, a Sorting node will be added under the lookup field. Right click this and click Add Sorting to define how the matching values are sorted before they are retrieved from the source table.
- Sum: Returns a sum of all the values that match the join criteria. This will only work on numeric values. Null values are ignored.
- Count: Returns a count of all the values that match the join criteria. Null values are ignored.
- Maximum: Returns the highest value of the values that match the join criteria. For strings, it will find the highest value in the collating sequence. Null values are ignored.
- Minimum: Returns the lowest value of the values that match the join criteria. For strings, it will find the lowest value in the collating sequence. Null values are ignored.
- Average: Returns the average value of the values that matches the join criteria. This will only work on numeric values. Null values are ignored.
- Click OK.
In addition to adding a new lookup field, you can copy an existing one.
To copy a copy a lookup field from one conditional lookup field to another
- Drag the lookup field from one cognitional lookup to the Lookup Fields node under another conditional lookup field.
Adding a Join to a Conditional Lookup Field
All conditional lookup fields need at least one join. Joins are used to calculate what value the conditional lookup field should have. If, for example, you are looking up CustomerName from a Customers table, the join could be "CustomerID on the source table equals CustomerID on the destination table".
Less complex joins will make the lookup perform faster. Complexity is a combination of the number of fields in the join and the data type. To get the best performance, use one single numeric field for the join.
To add a join to a lookup field, follow the steps below:
- Expand the lookup field, right-click Joins, and then select Add Join.
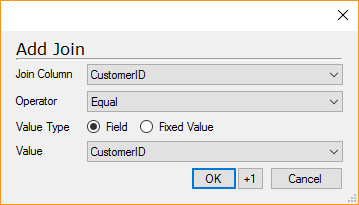
- In the Join Column list, select the field that uses the lookup.
- In the Operator field, specify when to look up a value.
- Click Field or Fixed Value to specify if you want to compare the field selected in the join column list to a field on the destination table or a fixed value. The Value box changes to fit your choice.
- Depending on the value type, click the relevant field in the Value list or enter a value in the Value box.
Note: If you do not add a join to a lookup field, it will use the default relation between the source and destination tables as a join if a relation exists.
In addition to adding a new join, you can copy existing ones when the source and destination tables are the same.
To copy a join from one lookup field to another
- Drag the join from one lookup to the Joins node under another lookup field.
To copy all joins from one lookup field to another
- Right click and drag the Joins node under one lookup field to the Joins node under another lookup field and click Add to Existing Joins.
To replace all joins on one lookup field with the lookups from another lookup field
- Drag the Joins node under one lookup field to the Joins node under another lookup field.
Adding Conditions to Lookup Fields
On each lookup field, you can add conditions for when to use that lookup field. The lookup will only be performed when the condition evaluates to true. For example, if you can determine that the lookup will only find related values when a certain field in the destination table has a certain value or apply a condition to avoid the lookup being performed on many records without finding a matching record.
Conditions must also be used when having multiple lookup fields within one conditional lookup field to determine which lookup field to use. Per default, the first lookup field where the condition evaluates to true will be used, even if it returns a NULL value or finds no matching records. If no conditions are specified, the first lookup field will always be used and any subsequent lookup fields will be ignored.
To add a condition to a lookup field, follow the steps below.
- Expand the lookup field and click Conditions. The Conditions task pane appears.
- Click on a Field in the pane.
- In the Operator list, click the operator you want to use.
- Click Value and enter a value to use in the comparison in the box
- OR -
Click Fields and select a field to use for the comparison in the list. - Click OK to add the condition.
Note: If you select the Custom operator, you can script your own condition. When you drag a field from the list to the right in the script editor, remember to specify if you refer to the field in the raw or the transformation view instance of the table by prefixing the column with "R.[FieldName]" or "T.[FieldName]". If you don't do this, TimeXtender will not be able to tell what field to use and the deployment of the data cleansing script will fail.
Custom Hash Fields
In scenarios with multiple fields making up the primary key, hashing the values of those fields into a single field can improve lookup performance. You can also use the field to easily investigate whether changes has been made to a record or not. In TimeXtender, such a field is called a custom hash field.
Adding a custom hash field
- Right-click a table and click Add Custom Hash Field. A custom hash field is added to the table and selected. The Custom Hash Key pane appear in the right hand side of the window.
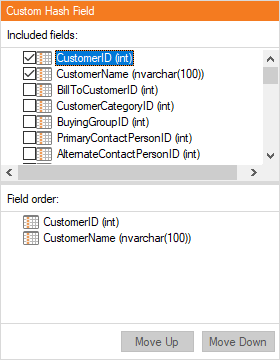
- In the Custom Hash Key pane, select the fields you want to include in the custom hash field.
- (Optional) Under Field order, you can reorder the fields using drag-and-drop or by selecting a field and pressing ALT + Up or Down. If you are comparing two fields, it is important that the sequence is the same on both custom hash fields. Otherwise, the hash value will be different even if the values of the individual fields are the same.
Changing the Hashing Algorithm for a Field
For compatibility reasons, we offer a number of different algorithms for hashing fields in TimeXtender. These hashing algorithms are available on all hashed fields in your project. Apart from custom hash fields, there can be the following hashed fields:
- Junk dimension key
- Surrogate hash key, type I hash key and type II hash key (used for history)
There is usually no reason to change the hashing algorithm for an individual field. The default setting, "use project default", ensures that all hash fields use the same algorithm which in turn makes it possible to compare the values of the individual fields. The most common exceptions are debugging purposes and "upgrading" the hashing algorithm of a field that was created in an earlier version of TimeXtender.
To change the hashing algorithm of a hash field
- Right click the field, click Hashing algorithm and click the hashing algorithm you want to use.
Supernatural Key Fields
A supernatural key is a key that is independent of the natural keys, e.g. customer numbers, that are found in the data and is durable, i.e. it does not change. Since natural keys can change in the source system and are unlikely to be the same in different source systems, it can be very useful to have a unique and persistent key for each customer, employee etc.
In TimeXtender, supernatural keys work like this: When you create a key, you choose some of the other fields on the table to base the key on. These fields are then hashed together and the hashed value is compared to other values in a key store table. If the same hash already exists, the corresponding key value is returned. If the hash does not exist, it is inserted into the key store and a new key value is generated and returned.
Adding a Supernatural Key Field
To add a supernatural key to a table, follow the steps below.
- Right click a table in a staging database or data warehouse and click on Add Supernatural Key Field.
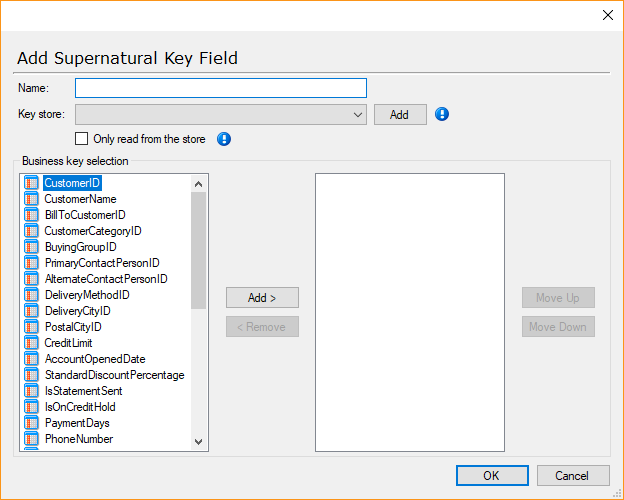
- In the Name box, type a name for the key.
- In the Key Store list, click on the key store you want to use
- OR -
Click Add to add a new key store. See Adding a Key Store below for more information.
Note: All supernatural keys that you want to relate should use the same key store. The data type of the field depends on the key store you use. - Select Only read from the store if you do not want to create a new entry in the key store when the business keys do not match an existing entry. The value of the field will be null if no matching key is found. With managed execution enabled, tables with fields with this option enabled will be executed after tables where the option is not enabled. This ensures the greatest possibility of a matching key in the key store.
- Under Business key selection, the available fields are listed in the left-hand list while the selected fields goes in the right-hand list. Add the fields you want to base the supernatural key on to the right-hand column.
Note: The order of fields matter since two lists of identical fields will only give the same result if they are ordered in the same way. Use the Move Up and Move Down buttons to reorder the fields. - Click OK to add the supernatural key field.
Adding a Key Store
Key stores are what ties supernatural key together. You will typically need a key store for each concept, e.g. customer or employee, you want to have a supernatural key for. Key stores exist on the data warehouse and staging database level, i.e. each data warehouse and staging database will have its own key stores.
To add a key store, follow the steps below.
- If your data warehouse or staging database does not contain a supernatural key field, add one. See Adding a Supernatural Key Field above for more information. This
- Expand the relevant data warehouse or staging database, right click Key Stores and click Add Key Store.
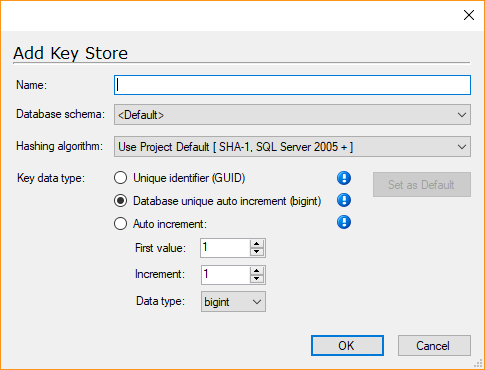
- In the Name box, type a name for the key store.
- (Optional) In the Database schema list, click on the database schema you want to store the key store in.
- (Optional) In the Hashing algorithm list, click on the hashing algorithm you want to use.
- Click on the key data type you want to use. You have the following options:
- Unique identifier (GUID): A 16 byte string of characters that is, for all practical purposes, universally unique.
- Database unique auto increment (bigint): A 8 byte int that is only unique within the database, but has better performance than the unique identifier.
- Auto increment: A customizable auto-incrementing value. You can customize the first value in the key store, the number to increment with when a new row is added and the data type.
- Click OK to add the key store.
0 Comments