Scripting
TimeXtender generates most of the code you need, but you can extend the functionality of TimeXtender by writing your own scripts. When you need to include custom SQL code in your project, you have different options depending on what you need to do.
- User Defined Functions and Stored Procedures are used to create reuseable code on SQL Server. TimeXtender uses them when it generates the code for executing your project. You can create you own User Defined Functions and Stored Procedures and call them from Script Actions.
- Script Actions enables you to add snippets of SQL code to be run before or after each step in the deployment or execution of a table. If the script action is added as a pre or post step for the execution of a table, and the table is added as part of a Execution Package, then the script action will be executed accordingly.
- Snippets are small pieces of parameterized code you can use on the field level or as user defined functions, stored procedures or script actions. In addition to the SQL snippets you use in the data warehouse, snippets come in SSAS Multidimensional and Qlik flavors.
- Custom Code lets you replace the code generated by TimeXtender for deployment and execution with your own code written in your favorite development environment.
You can also create global Project Variables for use in your scripts.
User Defined Functions and Stored Procedures
User Defined Functions allow you to define your own Transact SQL functions. A user defined function returns a table or a single data value, also known as a scalar value. You can, for example, create a function that can be used to perform complex calculations.
Stored Procedures allow you to define you own Transact SQL stored procedures.
Adding a User Defined Function or Stored Procedure
You can add user defined functions and store procedures to both the staging database and to the data warehouse. The steps for adding either one are similar.
- Under a data warehouse or a staging database, right-click User Defined Functions and click Add User Defined Function.
- OR -
Under a data warehouse or a staging database, right-click Stored Procedures and then click Add Stored Procedure.
The Add User Defined Function or Add Stored Procedure window will appear depending on your previous selection.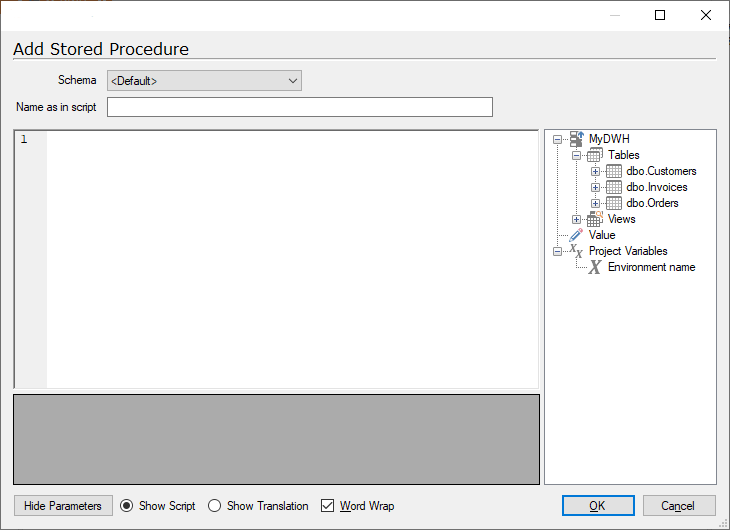
- In the Name as in script box, type a name for the function/procedure.
- In the main text box, enter the SQL code for the user function/procedure. You can drag in tables, fields, views, stored procedures, user defined functions and project variables from the list to the right to use in your function/procedure. Drag in "Value" to create your own custom variable.
- Click OK to save the function/procedure. A Script Action can then be created, if necessary, to call the function/procedure.
See where a User-defined Function or Stored Procedure is Used
To see where a user-defined function or stored procedure is used
- Right click the user-defined function or stored procedure and click Script Usage.
A window will appear with a list of objects that are associated with the user-defined function or stored procedure.
To navigate to the object in the tree
- Click on an object in the The script is associated with the following objects list and then click Go To.
Note: Script Usage is also avaiable on script actions.
Script Actions
Script Actions are SQL scripts that can be executed along with deployment or execution of a table to complete a number of different tasks. A Script Action can utilize the User Defined Functions and Stored Procedures that you have already created.
Adding a Script Action
- Under a Data Warehouse or a Staging Database, right-click Script Actions and click Add Custom Step. The Edit Custom SQL Script window appears.
- In the Name box, type a name for your script action.
- Enter your SQL script in the text box. You can drag in tables, fields, views, stored procedures, user defined functions and project variables from the list to the right to use in your script action. Drag in "Value" to create your own custom variable.
- Click OK to save the script action.
Adding a Script Action to a Table as Pre- or Postscript
Script actions are used in the project as pre- or postscripts for a table. As the names suggest pre- and postscripts are executed before - pre - or after - post - the execution steps for the table.
- Right-click the table you want to associate with the Script Action, click Advanced and click Set Pre- and Post Scripts. The Set Pre- and Post Scripts window appears.
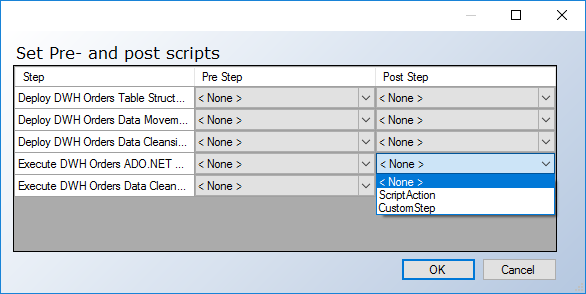
- The deployment and execution steps on the table in question are listed in the window. The steps at which you can call the script are:
- Deploy Table Structure
- Deploy Data Movement View
- Deploy Data Cleansing Rules
- Execute Transfer (pre-step): This will cause the script to be called prior to the beginning of the data transfer process which will copy data into the table.
- Execute Transfer (post-step): This will cause the script to be called after the transfer of data into the table has been complete, but prior to the beginning of the data cleansing process
- Execute Data Cleansing (pre-step): This will cause the script to be called after the transfer of data into the table has been complete, but prior to the beginning of the data cleansing process
- Execute Data Cleansing (post-step): This will cause the script to be called after the data cleansing process has completed.
- Click OK.
See where a Script Action is used
Please see See where a User-defined Function or Stored Procedure is Used
Snippets
Snippets are reusable, parameterized pieces of code for use in field transformations and other parts of your project. This enables you to write the code once and use it in multiple places, saving you the trouble of maintaining the same functionality on a many fields.
Snippets come in three flavors: SQL, SSAS Multidimensional and Qlik. When you build a data warehouse, you will be using SQL snippets.
Adding a Snippet
Whether you want to create a SQL, SSAS Multidimensional or Qlik snippet, the steps are the same. Follow the steps below to create a snippet and substitute SSAS Multidimensional or Qlik for SQL if that is the type of snippet you want to create.
- On the Tools menu, click Snippets. The Snippets window appears.
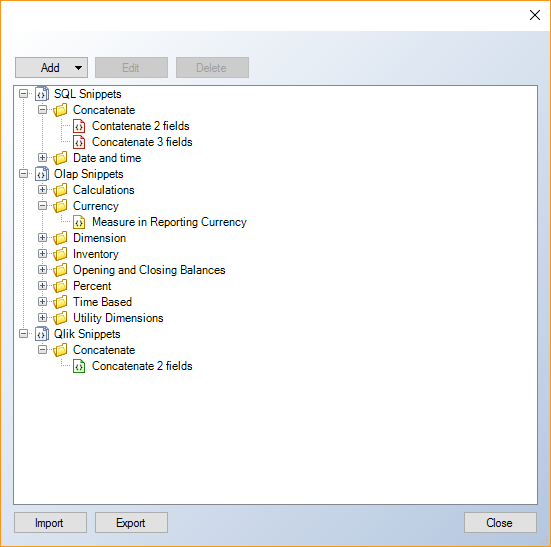
- Click Add and click SQL Snippet. The Create SQL Snippet window appears.
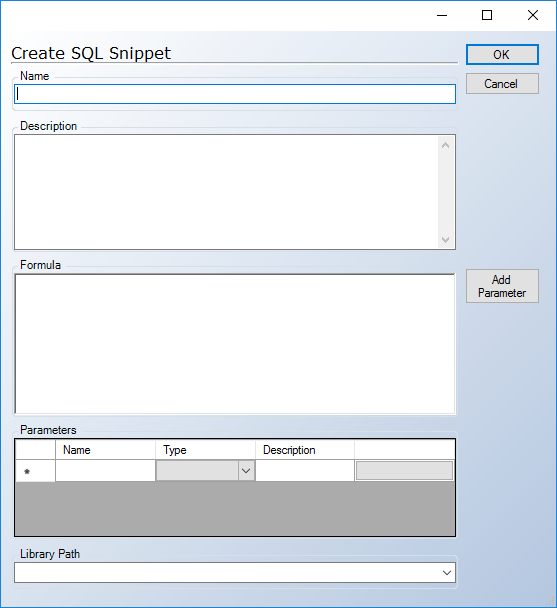
- In the Name box, type a name for your snippet.
- (Optional) In the Description box, type a description of what the snippet does.
- Enter the script in the Formula box. For any variables ('FieldName' in the example below), highlight the variable and click Add Parameter. This will add the highlighted text as a parameter name under Parameters.
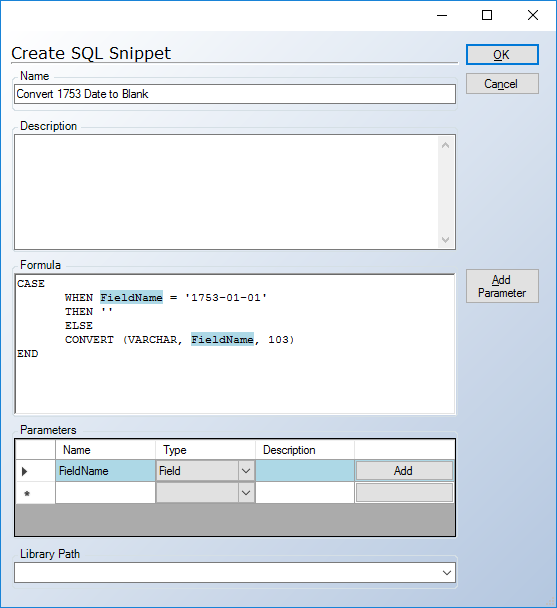
- Under Parameters, change the Type to match what the variable represents. You have the following options:
- Table
- Field
- Database
- User Defined Function
- Stored Procedure
- Value
- Click OK to save the snippet.
Using A SQL Snippet
SQL snippets can be used in a number of situations.
- To use a SQL snippet in a field transformation, right-click the field, click Add SQL Snippet Transformation and click on the SQL snippet you want to use.
- OR -
To use a SQL snippet as a stored procedure , right-click Stored Procedures, click Add Snippet Stored Procedure and click on the SQL snippet you want to use.
- OR -
To use a SQL snippet as a used defined function, right-click User Defined Functions, click Add Snippet User Defined Function and click on the SQL snippet you want to use.
- OR -
To use a SQL snippet as a script action custom step, right-click Script Actions, click Add Snippet Custom Step and click on the SQL snippet you want to use. - In the window that appears, map the available fields to the parameters in the snippet. Drag the field(s) from the list on the right and drop the field on the Object Name/Value column for the relevant variable. The Object Name/Value column and Variant column will populate automatically.
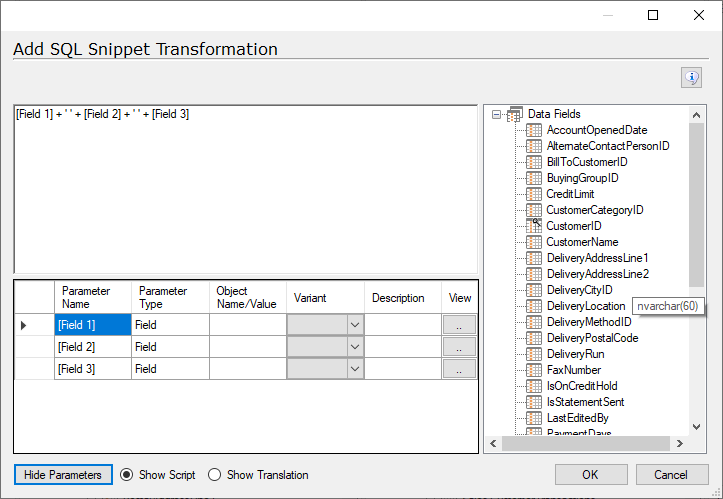
- Click OK.
Changing a Snippet
When you have added an object based on a snippet, you cannot make any changes to the content of the object. If you want to change the content, you need to change the snippet.
To change a snippet for a transformation, stored procedure, user defined function or script action based on a snippet
- Right click the object in question, click Edit <object type>, click Change Snippet..., select the snippet you want to use and click OK.
Customized Code
TimeXtender enables you to integrate "hand-written" code into a project by customizing the data cleansing procedure, transformation view and SSIS package on a given table.
Adding customized code to a table
To customize the code on a given table, follow the steps below:
- Right click the table in question, navigate to Advanced and click Customize code. The Customize Code window opens.
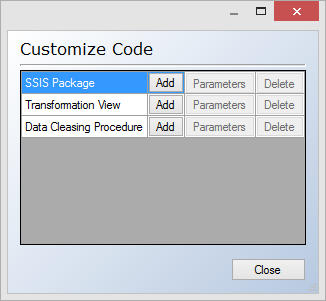
- Click the Add button to the right of the step you want to customize. The Choose Editor window opens.
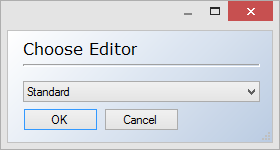
- In the Editor Name list, you have the following options:
- Standard is the basic built-in editor in TimeXtender.
- Default File Program is the program that is set to open files of the type in question. For the data cleansing procedure and the transformation view, the file name extension is .sql. For SSIS packages, the file name extension is .dtsx.
- Any custom editors you have added (see Managing Custom Editors).
If you are adding a SSIS package, the Custom SSIS window appears. Chose Create Default Package to edit the standard package, Create Destination Only to create a package that only contains the destination and Existing Package to import an existing package from the file system or an SQL Server.
Note: Some tables use multiple SSIS packages. When creating the Default package, TimeXtender will create the first SSIS package only. Examples of tables that will have multiple SSIS packages as default: Data warehouse tables that receive data from multiple staging tables, data source tables from NAV adapters with multiple companies, any data source table when template data sources are used.
- If you chose the Standard editor, the Edit window opens. When you have finished editing the code, click OK to confirm you edits.
If you chose a custom editor, TimeXtender will open the code in editor you chose. When you have finished editing the code, save your changes and close the editor. Back in TimeXtender, the Custom Code Editor window is open.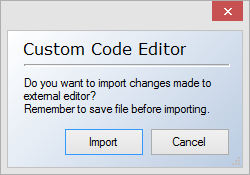
Click Import to import the changes you have made in the custom editor into your project. - When you return to the Customize Code window you will notice that you can now click Parameters (if applicable) and Delete. Click Delete to remove the customization and return to having TimeXtender generate the code. Click Parameters to decide which parameters are sent to the code on execution.
- Click Close to close the window.
Note: When editing the data cleansing procedure or the transformation view, make sure to have a "create procedure" or "create view" declaration in the code with the exact same name as TimeXtender would have sued. This is what is called during execution. To be sure, simply keep the first line of the code generated by TimeXtender.
Managing Custom Editors
To add, edit or delete a custom editor
- On the Tools menu, click Options. Click the Custom editors tab in the Options window that appears.
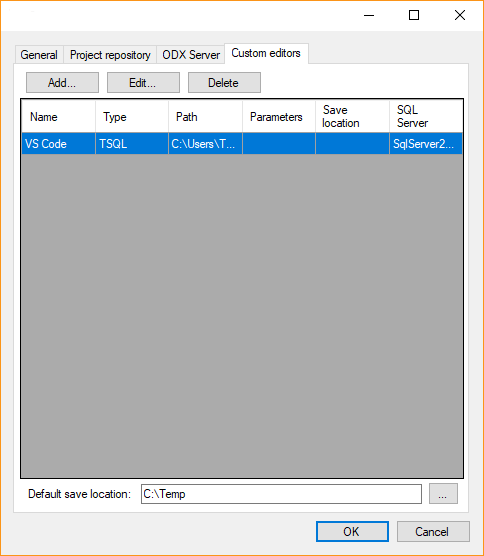
The list of custom editors is displayed. In the Default save location box, you can type the path to the folder where the custom code files are temporary stored (or click the folder icon to open a browse dialog).
To edit the settings for a custom editor, select the editor in the list and click Edit.
To remove a custom editor from the list, select the editor and click Delete.
To add a custom editor, follow the steps below:
- Click Add. The Add custom editor window appears.
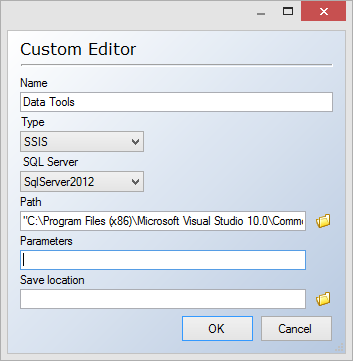
- In the Name box, type a name for the editor.
- In the Type list, click the type of editor you want to add. Choose TSQL if you want to use the editor with data cleansing procedures and transformation views and SSIS if you want to use it with SSIS packages.
- In the SQL Server list, select the SQL Server version that you are using. Currently, this setting is only used for custom editors for SSIS packages. When you want to customize the code for a SSIS package, TimeXtender checks what version of SQL Server the table is stored on. You will only be able to select editors that are marked compatible with that version of SQL Server.
- In the Path box, type the path that TimeXtender should call to start the program (or click the folder icon to open a browse dialog)
- In the Parameters box, type any additional parameters for the program.
- Optionally, in the Save Location box, type as save location for the editor (or click the folder icon to open a browse dialog).
- Click OK to add the custom editor.
Project Variables
Project variables allows you to save information in project-wide variables. This is useful when you need to distinguish different environments in a script or
The value of a given variable is determined when you deploy the object that uses the variable. As such, when you have changed a variable it is important to deploy the objects that uses this variable. The exception is when you use project variables with customized code. Here, the value of the variables is determined on execution.
The variable does not have a specific data type. If, for instance, you want to use the variable as a string, make sure to enclose the variable in quotes in the script.
Adding a Project Variable
To add a new project variable, follow the steps below.
- On the Tools menu, click Project Variables. The Project Variables window opens.
- Click Add. The Add New Variable window appear.
- In the Name column, type a name for the variable.
- In the Type list, click the variable type you want to use. You have the following options:
- Fixed: A fixed string.
- System: One of the following system properties:
- MachineName
- EnvironmentName
- UserName
- UserDomainName
- Source Scope: A property of the source of the current object. For instance, if you use a source scope variable in a custom transformation rule on a table in the data warehouse, the variable will have the value of property on the relevant staging database. Since different possible sources have different properties, the variable might not always have a value. Examples of properties include Database Name, API Version, Host, File Name.
- Destination Scope: A property of the destination of the current object, similar to source scope.
- Contextual Scope: A property of one specific element in the project, such as database name on a particular staging database.
- Dynamic: The value of the variable is generated by a custom script you written.
- If you are adding a dynamic variable, in the Resolve Type list, select when you want to resolve the value of the variable. You have the following options:
- Every Time: Resolve the value every time the value is used.
- One Time: Resolve the value when the variable is used for the first time and reuse the resolved value for the following uses until the project is closed.
- Each Batch: Resolve the value once for each batch, e.g. an execution.
- If you are creating a Contextual Scope variable, click the object you want to use in the Context list.
- If you are adding a Source or Destination Scope variable, click the Value Filter list and click the type of object you want to see available properties for in the Value field.
- If you creating a fixed variable, enter the value of the variable in the Value field.
- OR -
If you are creating a dynamic variable, click Script Editor to open the standard script editor in TimeXtender and write the script that generates the value.
- OR -
If you are creating a variable of a type other than fixed or dynamic, in the Value list, click the property you want to use as a value for the variable. - Click OK.
Using a Project Variable in a Script Action, Custom Transformations and Custom Views
Project variables are available for use when writing script actions as well as custom transformation rules and custom views. The available variables are listed in the tree view in the right hand side of the editor window. Simply drag the variable in from the tree to use it.
Using a Project Variable with Customized Code
Project variables are available as parameters when using the customized code feature. To make a project parameter available in a customized step, follow the steps below.
- Right click a table with customized code. Click Parameters next to the step in which you would like to use a project parameter. The Execution Parameters window opens.
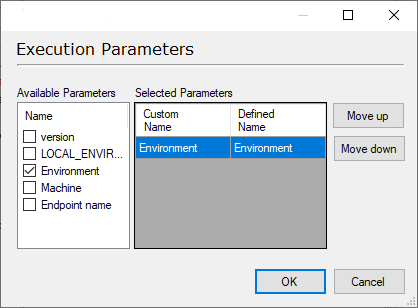
- In the Available Parameters list, select the variables you want to have available.
- (Optional) If you need to change the name of a parameter to match your custom code, double-click the parameter name in the Custom Namecolumn to rename the parameter.
- Click OK.
0 Comments