UNIT4 Business World (Agresso) Adapter
This adapter enables the extraction of data from the UNIT4 Business World ERP system, previously known as Agresso.
Adding an Agresso Adapter data source
Adding an Agresso Adapter consists of two major parts. Unlike other application adapters, the Agresso Adapter comes with a TimeXtender project based on Agresso's standard dimensional setup. Downloading and configuring this project is the first part, while the second part is configuring Agresso-specific settings for client, dimensions, translations and flexi-tables.
To download and configure the Agresso project, follow the steps below.
- In the File menu, TimeXtender click CubeStore. The CubeStore window opens.

- In the QuickCube Projects list, click Agresso and then click Download.
Note: The project is only available if you have a license for TimeXtender that includes the Agresso Adapter. - One the project has been downloaded, TimeXtender will ask you if you want to run the Connection Manager. Click Yes.
- The Connection Manager window opens.

Click Run Wizard. Four windows will now open in tour, allowing you to quickly configure the different connections. - Create a staging database for use with the project and click OK. For more information, see Adding a Business Unit.

- Enter the connection information for your Agresso database and click OK. For more information, see Adding a SQL Server Data Source.

- Create a data warehouse database and click OK. For more information, see Adding a Data Warehouse.

- Set up an SSAS Multidimensional server for the project. For more information, see Adding an SSAS Multidimensional Server.

- Back in the Connection Manager, click Test Connections to ensure that all connections work and click Close.

As mentioned earlier, the second part of adding an Agresso Adapter involves setting up the clients, dimensions, flexi-tables and translations that are part of the Agresso system.
To configure the Agresso-specific settings, follow the steps below.
- Right-click the Agresso Adapter you just added and click Setup Clients. A window containing a list of clients opens.
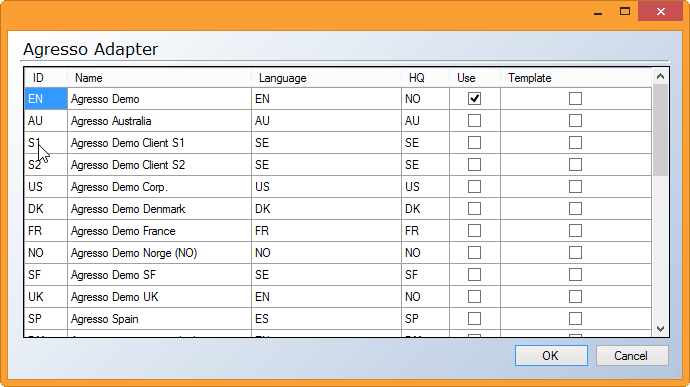
- Choose the clients you want to extract data from by selecting the check boxes in the Use column. If you want a client to serve as a template for the dimensional setup (see below), select the check box in the Template column. Click OK.
- Right-click the Agresso Adapter and click Synchronize Data Source. The synchronization window opens. Wait for the process to finish and click Close.
- Before the next step, the project needs to be deployed and executed. On the Tools menu, click Deploy and execute project. The Deploy and Execute window opens. Click Start, wait for the process to finish, and click Close.
- Right-click the Agresso Adapter and click Setup Dimensions. The Agresso Dimension Setup window opens.

- Click Load Dimension Values (Default setting only shows previously selected dimension attributes)
- Select the dimension attributes you want to use in the project. If you did not select a template in the client setup, you need to do this for each client.
- Click OK. The selected attributes are automatically added to the dimension table and can then be used in the project.

- Right-click the Agresso Adapter and click Setup Flexi Tables. The Agresso Flexi Table Setup window opens. The content of the Flexi Tables and Clients list depends on the clients and dimensions you have chosen previously.

- Select the combinations of flexi-tables and client attributes that you want to use in your project.
- Click OK. The selected flexi-tables are automatically added to the source tables and must be integrated into the solution.

- Right-click the Agresso Adapter and click Setup Translations. The Agresso Translation Setup window opens.

- Select the translations you want to use in your project from the Translation list.
- Click OK. The selected translations are automatically added to the source tables for use in the project.

0 Comments