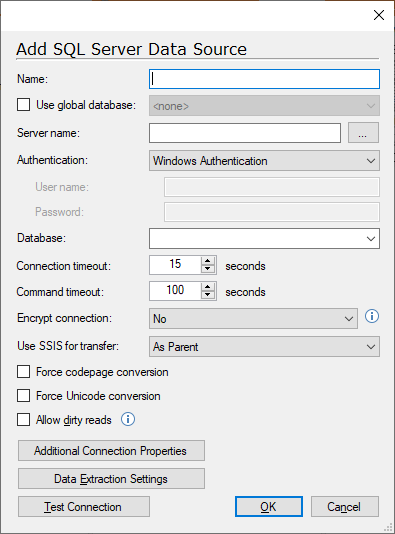
Microsoft SQL Server Data Source
TimeXtender supports all versions of Microsoft SQL Server as well as Azure SQL Database as a data source.
Adding a SQL Server Data Source
To add a new SQL Server data source, follow the steps below:
- Open a business unit, right click Data Sources, click Data Sources and then click Add SQL Server Data Source.

- In the Name box, type a name for the data source. The name cannot exceed 15 characters in length.
- In the Server name box, enter the location of the database server. Click the ellipsis (...) to choose one of the available servers in you local Active Directory, if any.
- In the Authentication list, click the mode of authentication you want to use. You have the following options:
- Windows Authentication: Use the logged-in Windows user's credentials for authentication.
- SQL Server Authentication: Use a login set up on the SQL Server. Enter the username and password in the corresponding fields.
- Azure AD Password Authentication: Use Azure AD credentials from a domain that is not federated with Azure AD. Enter the username and password in the corresponding fields.
- Azure AD Integrated Authentication: Use the logged-in Windows user's credentials for authentication, provided that he is logged in using Azure AD credentials from a domain that is federated with Azure AD.
- In the Database box, enter the name of the database, or select it from the drop-down list.
- In the Connection timeout box, specify the number of seconds to wait before terminating the attempt to connect to the server.
- In the Command timeout box, specify the number of seconds to wait before terminating the attempt to connect to the database.
- (Optional) In the Encrypt connection list, you can enable encryption of the connection, which is recommended when you are not in a private network (e.g. when your server is on Azure). You have the following options:
- No: The communication is not encrypted (default).
- Yes: The communication is encrypted. The server's certificate is verified by a certificate authority.
- Yes, trust server certificate: The communication is encrypted. but the server's certificate is not verified. This setting is not recommended for use on public networks.
- In the Use SSIS for transfer list click on Yes to enable SQL Server Integration Services data transfer, No to disable it or leave it at As Parent to respect the project setting.
- Select Force codepage conversion to convert all fields to the collation of the data warehouse.
- Select Force Unicode conversion to declare all alphanumeric fields as nvarchar.
- Select Allow dirty reads to allow reading from the source without locking the table.
- If you want to add additional connection settings, click Additional Connection Properties . In the Connection String Properties window, enter the required connection strings, and then click OK.
- (Optional) Click Data Extraction Settings if you want to limit the objects brought into TimeXtender before the data selection stage. For more information, see Filtering What Objects to Extract.
- Click Test Connection to verify that the connection settings you have specified are working and then click OK to add the data source.
1 Comments