Slowly Changing Dimensions
Slowly Changing Dimensions (SCD) enable an organization to track how dimension attributes change over time. For example, it is possible that an item may be associated with a particular product group code but that it is later reclassified into a different product group. The organization wants to be able to analyze the historical sales data that occurred when the item was assigned to the original product group as well as more recent sales data that has occurred after the item was reclassified to the new product group.
Different Types of Slowly Changing Dimensions
Type I
Type I dimensions will automatically overwrite old data with updated data from the data source. An example of this would be a change in a customer name. In the data source, the name for a particular customer is changed from ABC Consulting to Acme Consulting. The next time that the data warehouse is updated the customer name will be changed from ABC Consulting to Acme Consulting and no historical record of the change is kept. All historical, current, and future transactions will be displayed under the new customer name of Acme Consulting. This is the default methodology of updating data in the data warehouse and no setup is required.
Type II
Type II dimensions will enable the tracking of dimension attributes historically by inserting additional records into the table as the values in specified fields are changed. TimeXtender will administer the tracking of the dimension values as well as the updating of the table. Each record for a particular value, such as an item number, can be viewed as a different version of this item. The transaction table can then be linked to this table to display which version of the item was associated with the transaction based on the transaction date.
The follow example illustrates what the Customer dimension table would resemble if the example above was tracked using Type II functionality.
|
Customer No |
Name |
City |
State |
Version |
From Date |
To Date |
|---|---|---|---|---|---|---|
|
123 |
ABC Consulting |
Portland |
OR |
1 |
1/1/1900 |
9/18/2012 |
|
123 |
Acme Consulting |
Portland |
OR |
2 |
9/18/2012 |
12/31/9999 |
Implementing Type II Slowly Changing Dimensions
The steps below will explain how to utilize slowly changing dimensions - also known as History in TimeXtender - in a project. In the example, there will be an item named "Bicycle" that has historically had an Inventory Posting Group of "Finished". Recently, however, this item has been reclassified and is now associated with the Inventory Posting Group "Resale". The organization wishes to track sales for this item under both the historical Inventory Posting Group as well as the new one.
Enabling Slowly Changing Dimensions on the Dimension Table
See Enabling History on a Table to learn how to set up history on the dimension table.
Example
The screen-shot below illustrates what the Item table currently looks like for the item that is being used in this example. There is one record for the item and currently the Inventory Posting Group is set to "Finished".

The item is now reclassified into the Inventory Posting Group Code of "Resale.". An invoice is then posted that reflect a sale of 100 of the bicycles with the new Inventory Posting Group. To illustrate how the Item table now looks in the staging database, the table is executed to reflect the changes and the results are displayed below:

The DW_Account and No. fields are the same, but the Inventory Posting Groups now reflect the new value. The DW_ID, which represents a unique record number in the table, is also different as illustrated on the right in the screenshot above.
There are a few more fields that pertain to the historical values that are useful as well. When the table is executed and notices a change in one of the Type II fields, it will automatically add in the dates for which the old value ended and the new value begins. These are the "SCD From Datetime", "SCD To Datetime", and "SCD "IsCurrent" fields.

The To and From field represent the date ranges that this version of the dimension was used in and which record is the current record.
Bringing the Surrogate Key to the Transaction Table
In a standard transaction table, the transaction itself will only be linked to the Item No. This is problematic, as the item number alone does not identify which version of the item record the transaction applies to. In order to see this detail, the surrogate key from the Item table will be brought into the transaction table. This surrogate key is based on the To and From dates in the Item table, as compared with the Posting Date of the transaction. In the screen-shot above, all transactions between January 1, 1900 and September 25, 2012 will be associated with the first version of the Bicycle item where the Inventory Posting Group is "Finished". Any transaction after September 25, 2012 will be associated with the latest version of the Bicycle item where the Inventory Posting Group is "Resale".
A surrogate key is a substitution for the primary key in a table. The surrogate key most often represents the unique row number in the table. It can be used in one table to refer back to a specific record in another table without having to utilize the natural primary key. In TimeXtender, all tables in the staging database and data warehouse have a called named "DW_ID" which represents the surrogate key in each respective table.
In order to see the DW_ID field in TimeXtender, follow the steps below.
- Right-click the table, click Advanced and click Show System Control Fields.
- Move the DW_ID field from the Item table, and add it to the transaction table.
- Rename the field to "Item Surrogate Key" to make it easily understandable to other users.
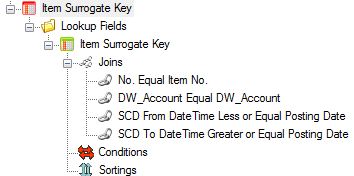
- Add Standard joins between the two tables for DW_Account and the Item No.
- Add Additional joins for "SCD From Date Time" Less Than or Equal to "Posting Date" and "SCD To Date Time" Greater Than or Equal to "Posting Date". This will capture the correction version of the item based on the Posting Date of the transaction.

-
Deploy and execute the transaction table to have the new field added and populated.
The process above should be repeated for any additional transaction tables where history needs to be tracked.
Moving the Surrogate Key from the Transaction Table in the Staging Database to the Data Warehouse
Now that the surrogate key has been added to the transaction table(s), this field needs to be added to the relevant transaction tables in the data warehouse.
To accomplish this, follow the steps below.
- Drag the surrogate key field (in this case "Item Surrogate Key") from the table(s) in the staging database and drop them onto the relevant tables on the data warehouse.
- Deploy and execute the transaction table in the data warehouse for the changes to take effect.

Adding the Surrogate Key to the Dimension Table in the Data Warehouse
The DW_ID field now needs to be added to the related dimension table in the data warehouse. This ensures that the proper mapping will be made between the dimension table and the transaction table in the cubes.
To accomplish this, follow the steps below.
- Drag the DW_ID field from the dimension table in the staging data (in this example, the Item table) to the related dimension table in the data warehouse (in this example, the Item table).
- Deploy and execute the dimension table for the changes to take effect.

Updating the Dimension Key
The dimension key should now be updated to include this surrogate key. This will ensure that Analysis Services sees the uniqueness of the dimension, not as the natural key (in this example Item No.), but as the combination of Item No. and the surrogate key.
To accomplish this, follow the steps below.
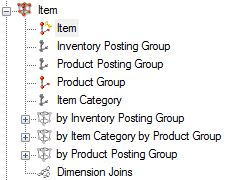
- Expand Dimensions, expand the dimension, and edit the key level (in this example "Item").

- To the right of the Key Column click the ellipsis (...), and add the surrogate key to the dimension key (in this example, it is the "Item")

Updating the Dimension Relationships in the Cube
The relationships between the dimension and the transaction table should be updated in the cube to reflect the change made to the dimension key in the previous step.
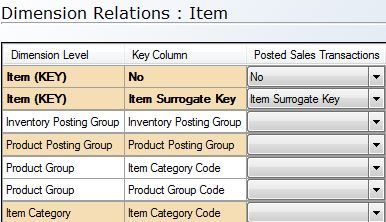
- Right-click the relevant dimension in the cube(s), click Dimension Relations and click All Fact Tables.
- Set the dimension relationship to use the surrogate key that was added to the transaction table in a previous step.

- Deploy and execute the SSAS Multidimensional database for the changes to take effect.
The final result is that users can see data based on the historical attributes that may no longer exist in their ERP system because the information has been overwritten. In the screen-shot below, the "Bicycle" item shows up twice with the sales amounts associated with the various Inventory Posting Groups that have been used for the item over time.

0 Comments