Dimensions
Dimensions define how a user looks at data in a cube. Dimensions are created independently of a particular cube and can be used within several cubes at the same time. The same dimension can also be utilized several times within the same cube, which is referred to as a role-playing dimension. A common example of this would be the Date dimension, which can represent both the Document Date and Posting Date in a cube, thus having a single dimension play two roles.
Regular Dimensions
Regular dimensions are based on a snowflake or a star schema, and are used to create balanced or ragged hierarchies.
Creating Regular Dimensions
- From the Solution Explorer, open the relevant server, right-clickDimensions, and then select Add Dimension. The Add Dimension window appears.
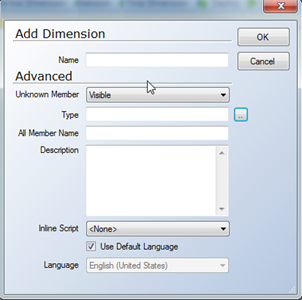
- In the Name field, type a name for the dimension.
- In the Unknown Member list, select Visible to apply an Unknown Member to dimension keys in the fact table with no matching dimension members. This will allow dimension values that exist in the fact table, but not the dimension table to be combined together and displayed to the user as an Unknown value. This is the default and recommended setting in TimeXtender. An example could be a Salesperson Code that exists in the sales transactions fact table but does not exist in the Salesperson dimension table.
- Next to the Type box, click the ellipsis (...) and select the type of dimension you want to create. You can leave the Type blank for regular dimension types, which are the most common type.
Type Description Regular Default for dimensions that are not set to a specified type Time Used for dimensions whose attributes represent time periods Geography Used for dimensions whose attributes represent geographical information Organization Used for dimensions whose attributes represent organizational information BillOfMaterials Used for dimensions whose attributes represent inventory and manufacturing information Accounts Used for dimensions whose attributes represent information used for financial reporting Customers Used for dimensions whose attributes represent information about customers Products Used for dimensions whose attributes represent information about products Scenario Used for dimensions whose attributes represent information about plans and strategies Quantitative Used for dimensions whose attributes represent quantitative information Utility Used for dimensions whose attributes represent utility information Currency Used for dimensions whose attributes represent currency information Rates Used for dimensions whose attributes represent currency rate information Channel Used for dimensions whose attributes represent channel information Promotion Used for dimensions whose attributes represent marketing promotion information
- In the All Member Name box, type a name for the All Member. This is left blank by default, which means that Analysis Services creates the All Member Name automatically. The All Member is the dimension value which represents all members of the dimension. An example would be a dimension value of “All Customers”, which would represent every customer in the Customer dimension.
- (Optional) In the Description box, type a description for the dimension.
- Click OK to add the dimension.
When you have added a dimension, you also have to add at least one dimension level. The Add Dimension Level dialog is displayed when you click OK to add a dimension. For more information, see Adding Dimension Levels.
Once you have created a dimension, you can use the dimension in several cubes at the same time. Dimensions that are used in more than one cubes at a time are known as role playing dimensions.
Parent-Child Dimensions
Parent-child dimensions are used to create unbalanced hierarchies where the branches descend to different levels, and where the parent and the child exist in the same table. Typically, parent-child hierarchies are used for creating organizational hierarchies.
Creating Parent-Child Dimensions
A parent-child dimension is a hierarchy that is defined by a parent column and a child column in the same table. A member of the hierarchy can appear more than once in the hierarchy.
To create a parent-child dimension, follow the steps below.
- Expand SSAS Multidimensional Servers, expand the relevant server, right-click Dimensions and click Add Parent-Child Dimension. The Add Parent-Child Dimension window opens.
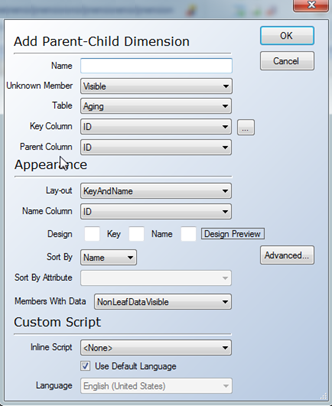
- In the Name box, type a name for the dimension.
- In the Unknown Member list, select Visible to apply an Unknown Member to dimension keys in the fact table with no matching dimension members.
- In the Table list, select the main table of the dimension.
- In the Key Column list, select the key column of the child table. This column identifies each member of the dimension.
- In the Parent Column list, select the key column of the parent field. This column identifies the parent of each member.
- In the Lay-out list, select how you want the dimension level displayed to the end user. The following options are available:
Setting Description Key Displays only key column values Name Displays only name column values KeyandName Displays the key column first and then name column values NameandKey Displays the name column values first and then the key column values - In the Name column list, select the column that provides a meaningful value to the user. This field is only available if you have selected the Name,KeyAndName, or NameAndKey layout.
- In the Design fields, specify which separator to use in the front-end application to separate Key and Name. This field is only enabled if you have selected KeyAndName or NameAndKey. The order in which the Key and Name text fields appear depends on your selection in the Layout list. To preview the design of the layout, move the pointer over Design Preview.
- In the Sort Bylist, select whether you want the values sorted by Key or Name.
- In the Sort by Attribute list, select the specific attribute key or name that you want the values sorted by. This list is only available when you are working with key levels, and Sort By is set to AttributeKey or AttributeName.
Note: When you create the parent-child dimension based on a consolidation table, you will typically use a Sort By Attribute. You therefore need to create a Sort order dimension level where the key column is Sort Order. Then, you must enable Unary column and Roll up column on the dimension. You can then set the parent-child dimension to Sort By Attribute.
Defining Advanced Parent-Child Dimension Settings
- To access advanced settings for Parent-Child dimensions, click Advanced... in the Add/Edit Parent-Child Dimension window.
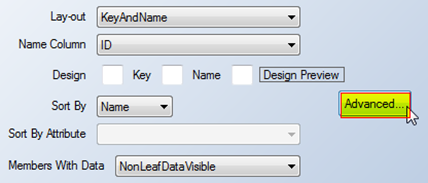
The Advanced window opens.
- Next to the Type box, click the ellipsis (...) and select the type of dimension you want to create. You can leave the Type blank for regular dimension types, which are the most common type. For a list of possible dimension types, see Creating Regular Dimensions.
- In the Root Member If list, select one of the following options that controls when the dimension is the root member:
Option Description ParentIsBlank Hides the root if the member is a null, a zero or an empty string ParentIsBlankSelfOrMissing Hides the root if the member is a null, a zero, an empty string, if the parent is missing, and if the member itself is a parent ParentIsMissing Hides the root if the parent is missing ParentIsSelf Hides the root if the member itself is a parent - In the Unary Column list, select the column that contains the unary operators that are used in this dimension level. If you have to select Enable to select from this list.
- In the Roll-up Columnlist, select the column that contains the roll-up values used in this dimension level. You have to select Enable to select from this list.
Adding Dimension Levels
Dimension levels are used to create a dimension attribute within a cube, which enables a user to drill down or roll-up through data. A dimension must contain at least one dimension level.
- Open and expand the server that contains the dimension you want to add a level to. Then expand Dimensions, right-click the dimension and click Add Dimension Level. The Dimension Level window opens.
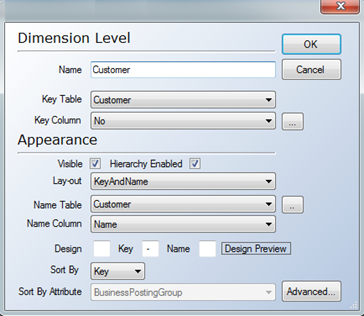
- In the Name box, type a name for the dimension level.
- In the Key Table list, select the table in the data warehouse to add the dimension from.
- In the Key Columnlist, select the column which uniquely identifies the records in the table. If the key is a composite key, click the ellipsis button (…), to select the attributes on which the Key column is based.
- Select Visible if you want the level to be displayed in the front-end application.
- In the Layout drop-down, select the way that the dimension level should be displayed to users. The options are:
Setting Description Key Displays only key column values Name Displays only name column values KeyandName Displays the key column values first and then name column values NameandKey Displays the name column values first and then the key column values - In the Name Table list, select the table that provides a meaningful name to the user. To set the Name Table value to the same value as the Key Table value, click the ellipsis button.
- In the Name Column list, select the column that provides a meaningful value to the user.
- In the Design fields, type the separators to use in the front-end application to separate key and name. This field is only enabled if you have selected KeyAndName or NameAndKey. The order in which the Key and Name text fields appear depends on your selection in the Layout list. To review the design of the layout, move the pointer over Design Preview.
- In the Sort By list, select if you want the values sorted by Key or Name. If you are adding a key level, you can also sort by AttributeKey and AttributeName.
- In the Sort By Attribute list, select the specific attribute key or name that you want the value sorted by. This list is only available when you are working with key levels, and Sort By is set to AttributeKey or AttributeName.
- Click OK. The dimension level is added to the Dimensions tree below the dimension it belongs to. The SSAS Multidimensional database must be deployed and executed before this change takes effect in the front-end.
Adding Quick Levels
Quick Levels provide an easy way to add new dimension levels. It will automatically set defaults which can later be changed by editing the dimension level.
- Expand the relevant server, expand Dimensions, right-click the parent-child dimension or key level on the dimension to which you want to add a level and click Add Quick Levels. The Add Quick Levels window appears.
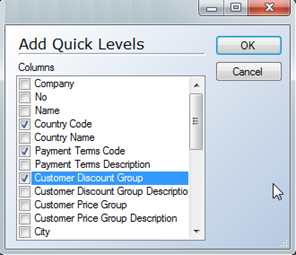
- Select the columns you want to use as levels from the source table in the data warehouse, and then click OK.
The levels you have added are now available when you create a hierarchy. The SSAS Multidimensional database must be deployed and executed before this change takes effect in the front-end.
Adding Dimension Joins
Dimension joins are joins between two tables that are not directly related to the dimension's fact table. You only use dimension joins in snowflake schemas where you want more than one table in a dimension. The join is a one-to-many join.
- Open and expand the server that contains the dimension you want to modify, expand Dimensions, expand the dimension to which you want to add a join, right-click Dimension Joins, and then click Add SSAS Multidimensional join. The Add Join window opens.
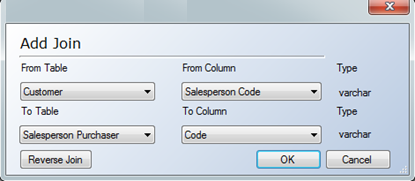
- In the From Tablelist, select the table from which you want to create a join.
- In the To Table list, select the table to which you want to create a join.
- In the From Column list, select the column from which you want to create a join. The column's data type is displayed next to the list. You can only make joins between fields with compatible data types.
- In the To Column list, select the column to which you want to create a join. If the column's data type is not compatible with the data type of the From Column, the data type is displayed in red.
- If you want to reverse the direction of the join, click the Reverse Join button.
- Click OK. The dimension join is displayed in the Dimension Joins folder in the Dimensions tree.
Adding Dimension Hierarchies
Once you have added dimension levels to a dimension, you can create a dimension hierarchy. Dimension hierarchies make it easier for users to look at commonly used dimension groupings by only having to drag one icon into a report. An example of this could be Customers by Country or Items by Item Category.
- Expand the relevant server, expand Dimensions, right-click the dimension to which you want to add a hierarchy and then select Add Hierarchy. The Hierarchy window opens.

- In the Hierarchy Name field, enter a name for the hierarchy. The name cannot be the same as the name of a dimension level.
- In the Dimension Levels pane, click the levels you want to be part of the hierarchy. The hierarchy elements are then listed in the right pane. You can drag the dimension levels in the right pane up and down to specify the order they should exist in from top to bottom
- In the Description field, type a description of the hierarchy. This field is optional.
- In the Display Folder list, select the folder where the hierarchy is displayed by the front-end application. This is optional.
- Click OK. The SSAS Multidimensional database must be deployed and executed for this to be finalized for the end users.
Note: Since the hierarchy is associated with the dimension itself, once the dimensions and cubes are deployed and executed, the hierarchy will automatically show up in all cubes in which the dimension exists.
Adding a Time Dimension
Date dimensions are based on time or date tables, so you have to create a time or date table in the data warehouse before you can create a time dimension. For more information, see Adding Date Tables.
To add a date dimension on your server based on a date table, follow the steps below:
- Right click Dimensions and click Add Time Dimension. The Add Date Dimension window opens.
- Type a Name for your Date Dimension, click the date table you want to use as a basis for the date dimension in the Table list and click OK.
- The date dimension will then be created based on the data table and appear in the SSAS Multidimensional tree under Dimensions. It includes date, week, month, quarter, half year and year dimension levels, in both fiscal year and non-fiscal year variations, as well as any custom periods and Calendar and Fiscal Calendar hierarchies.
- (Optional) It might be useful to configure any custom period dimension levels to use the name of the custom period as a key. If, for instance, you have defined a number of national holidays across many years, these will then be grouped as op-posed to a having “unique” yearly holidays for each year. To do so, right click any custom period level and click Edit Dimension Level and click [custom period name]Name in the Key Column list.
When you expand the date dimension, you can see that the levels which correspond to fields on the date table in the data warehouse have already been added. However, you can add more levels simply by adding quick levels or by adding regular levels. You can add hierarchies as well.
0 Comments