Cubes
Cubes are the cornerstone when presenting data through SSAS Multidimensional. Cubes are typically built around central functions in the company, such as sales, finance, inventory etc.
Adding SSAS Multidimensional Cubes
To add a cube, follow the steps below.
- Open the server, right-click Cubes and click Add Cube. The Add Cube window appears.
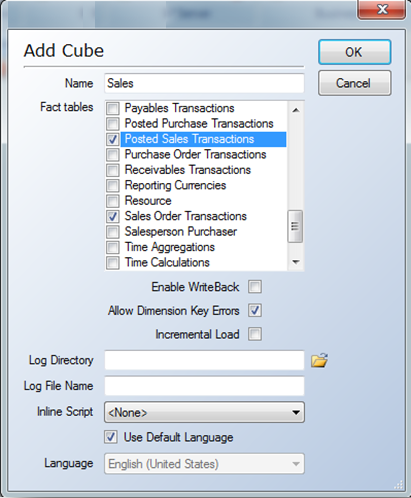
- In the Name field, type a name for the cube.
- In the Fact Table list, select on the table(s) from the data warehouse you want to use for the cube.
- If you want end users to be able to change cube data while they browse it, select Enable Writeback. Any changes the end users make are saved in the write-back table.
Note: You can only utilize write-back if the front-end application supports it.
- If you want to continue processing the cube even if dimension key errors occur, select Allow Dimension Key Errors. When you allow dimension key errors, all errors are reported to a log and you need to specify where you want to store the log. Click the folder icon besides Log Directory. This opens a new window. Navigate to the folder you want to store the log in and click OK. In the Log File Name box, type a name for the log file.
- ClickOK to add the cube.
Adding a Single Dimension to a Cube
- Expand Dimensions and drag-and-drop the dimension to the cube.
- Set the relationship to the fact table in the cube. See Adding Dimension Relationships.
Adding Multiple Dimensions to a Cube
You can also add multiple dimensions to a cube in one operation.
- Open the server, expand to Cubes, and then expand the cube you want to add dimensions to.
- Right-clickDimensions, and then select Add Dimension to Cube. The Add Dimensions to Cubewindow opens with all the dimensions in your project listed.
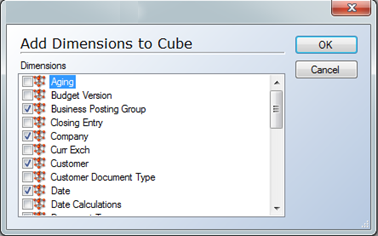
- Select the dimension or dimensions you want to add, and click OK.
You must then set the relationship to the fact table in the cube. See Adding Dimension Relationships.
Adding Role-Playing Dimensions
Role-playing dimensions are dimensions that are used more than once in the same cube. For example, you can use a Customer dimension more than once in the same cube.
When you have added a role-playing dimension to a cube, you should follow the steps described above to add the dimension and then specify a new name for the dimension to distinguish it from the other dimensions of the same type. Then define the relationship to the proper field in the fact table.
For example, the Customer dimension may be used as the Bill-to Customer dimension, which relates to the Bill-to Customer No. field in the fact table, while the Sell-to Customer dimension may relate to the Sell-to Customer No. field in the same fact table.
Adding Dimension Relationships
Dimension relationships specify how a dimension is related to a fact table. You must define how each level in a dimension is related to a fact table.
- Expand the server that contains the relevant cube. Expand the cube, right-click Dimensions, click Dimension Relations and click All Fact Tables.
- The Dimension Relations window opens.
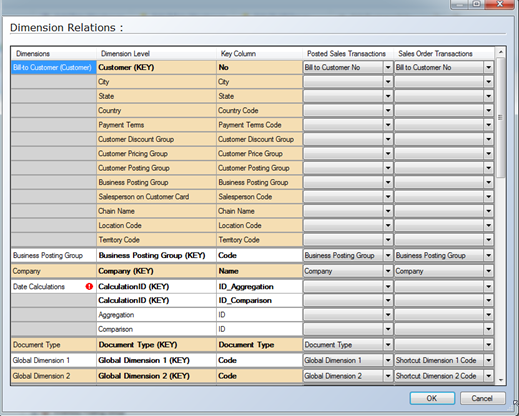
The table contains the following columns:Column Description Dimension Displays all dimensions in the cube Dimension Level Displays all dimension levels associated with each dimension Key Column Displays the key column for each dimension level <Fact Table Name> Displays the name of the fact table - In the Fact Table column(s), select the field where you will join the dimension key with the dimension. The dimension levels in Bold are the required values to be set for each dimension.
- Click OK when you have created all of the necessary relationships.
Validating Cube and Dimensions
To validate a cube or a dimension
- Right-click the cube or dimension you want to validate, and then click Validate Cube/Dimension. If the cube or dimension is valid, an OK message is displayed. Click OK to close the message dialog. If the cube or dimension is invalid, a message is displayed outlining the changes that you need to make.
The Cube Browser
The Cube Browser allows a TimeXtender user to browse a cube from within TimeXtender without first leaving to go into another application such as Excel. The Cube Browser is not meant to replace a proper front-end tool, such as Excel, but is an easy way to browse the cube structure without having to navigate away from TimeXtender.
To open the Cube Browser
- Right-click the cube and click Browse Cube.
Using the Cube Browser
The user interface is similar to pivot tables in Excel. Measures and dimensions are dragged from the list on the right and dropped in either the boxes in the lower right-hand corner or directly onto the workspace pane on the left.

The following report was created from the Sales cube for NAV by dragging the Date dimension into the Rows box, theSalesperson on Document dimension into the Columns box, and the Sales Amount measure into the Measures box.

Filters for the rows and columns can be added by clicking the Filter icon to the left of the row and the column labels in the workspace pane on the left.

Dimensions can also be expanded and collapsed by clicking the plus and minus signs respectively.

Cube Writeback
Cube Writeback is a feature that allows users to update or add data to the cubes through the front-end. When Writeback is enabled for a cube, it will be enabled for all measure groups in that cube.
The structure of the fact tables will be maintained and updated when the structure of the cube changes.
It is important to understand how writeback works before implementing it. While this document does not target its full scope, it warrants a thorough understanding. Otherwise, users will find themselves performing actions that are incomplete.
To enable this feature
- Right-click the relevant cube, click Edit Cube and select Enable WriteBack in the window that appears.
When writeback has been enabled, a writeback table will be created in the data warehouse on the next deployment. Whenever anything is written to a measure, it will be added to the writeback table. Data will never be written directly to the original fact table.
For the best results, design a separate cube specifically targeted for cube writeback.
Offline Cube Processing
TimeXtender supports functionality that allows cubes to be processed without being taken offline. Normally, when a cube is processed and rebuilt in SQL Server Analysis Services, it is taken offline during the duration of the processing and is made unavailable to end-users.
SQL Server Enterprise Edition allows the cube to be kept online, but if you do not run this edition of SQL Server, the Offline Cube Processing feature of TimeXtender allows you achieve the same result.
Enabling Offline Cube Processing means that the cubes can be updated throughout the business day without disturbing end-users. While the cube is being processed, the users will have access to the original version of the cube, which is replaced with the new version of the cube once processing has been completed.
Enabling High Availability Cube Processing
- Right click the server and click Edit SSAS Multidimensional Server. The Edit SSAS Multidimensional Server window appears.
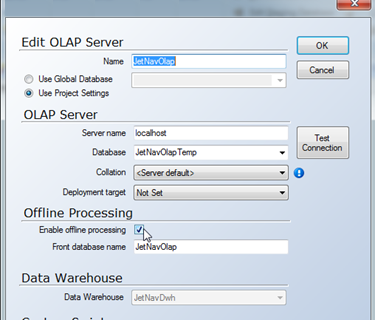
- Rename the Database to represent a temporary SSAS Multidimensional database that will be used during processing. This is not the database that will be used by end-users.
- Select Enable Offline Processing.
- Type in the name of the database that will be used by end-users in Front Database Name.
- Click OK.
- Right-click the SSAS Multidimensional database and click Deploy and Execute.
- You will notice two new steps under Executed SSAS Multidimensional Server that handles Offline Cube Processing. These are Initialize Offline Processing and Finalize Offline Processing.
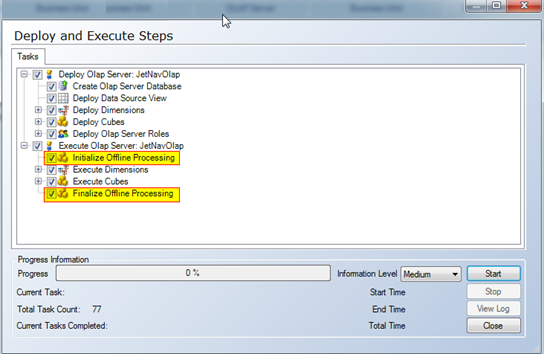
- Click the Start button to begin processing the cubes. Users will now be able to access the cubes as they are being processed.
0 Comments