This guide will walk you through how to implement Data Selection rules that are:
- Dynamic - will change based on a given difference in the current date (e.g. 30 days ago)
- Variable - All Data selection will change if the variable is updated without having to update each Data Selection individually.
- Environment Specific [Optional] - Applying the Data Selection in one environment and not another.
- An ideal use case for this is using only the last 30 days of data in the Development environment while still extracting ALL data in Production.
In this topic:
Create your Project Variables
Dynamic Date
The first step is to create a Project Variable that results in a dynamic date based on the current date. In this example I will use 30 days before the current date.
In the Tools menu, click on Project Variables & click Add.
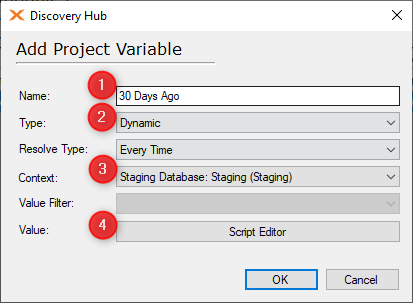
- Give your variable a name
- Under Type, select Dynamic - This will allow you to write a query to determine the variable.
- Under Context select the server/database where you want to run the query. In this example, I'm using Staging. However, If your source is Oracle, for example, you would need to set the oracle data source as the context to extract the correct date format for use when creating the data selection rule.
- Click Script Editor
Here you'll want to write the query that will pull the date from 30 days ago. I can do this using T-SQL using the following query:
SELECT DATEADD(DAY,-30,GETDATE())
Once you have written your query, be sure to click on the "Show Value Translation" to process the query and show the result. This will help verify that the query is giving you the desired result.
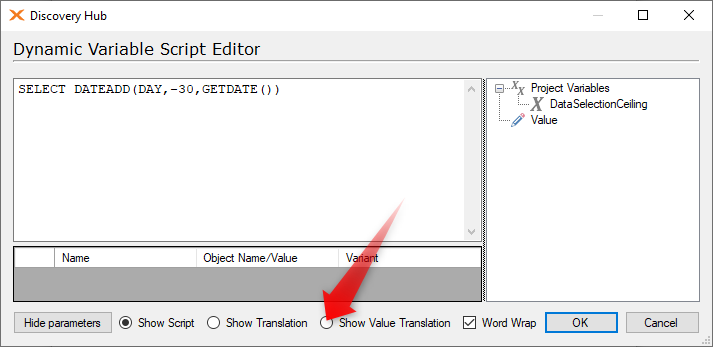
Click OK to finish creating your first variable.
Environment
You can skip this section if you don't wish your data selection to be environment-specific.
Create another Project Variable.

- Name the Variable "Environment"
- Change Type to "System"
- Change Value to "Environment Name"
Click OK to finish creating the Environment the variable
Add Your Data Selection Rules
Now you will need to add your Data Selection rules.
- Navigate to the Tables in the Data Source that you wish to filter. (Note: In the Business Unit - Staging database, Data Selection rules are applied at the Data Source level, not on the staging level.)
- Right-click on the table > Add Data Selection Rule
- Ensure the Operator drop-down at the bottom of the data selection pane is set to "Custom"
- Click Add
This will open a script window. Here, you will type in everything that would come after the WHERE in a WHERE clause. In this example, I'm using a table called SalesOrderHeader, filtering on a date field called OrderDate. To do this I could write the following script:
[OrderDate]>'2015-01-01'
However, I want this date to be dynamic. So I will replace the date by dragging in the "30 days ago" variable I created earlier from the pane on the right. The variable MUST be in single quotes as shown in the screenshot.
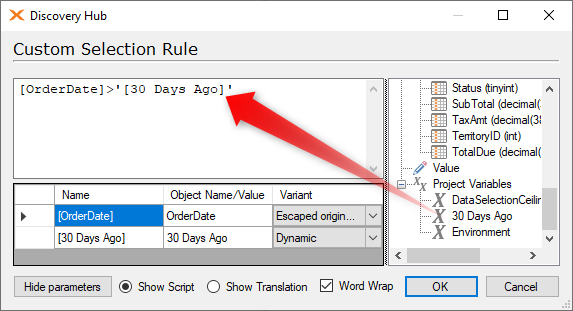
Be sure to click the "Show Translation" radio button to verify the variable is resolving correctly.
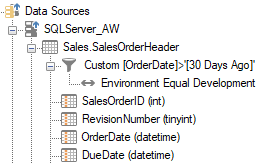
Once done, click OK to create your data selection rule. It should look something like this:
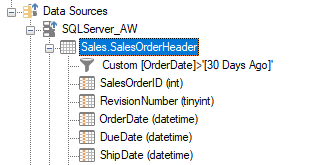
Now, repeat these steps for any other tables you wish to filter, using the same project variable in each.
Specify the Environment
If you wish your selection rules to be environment-specific you can use the following steps with each table.
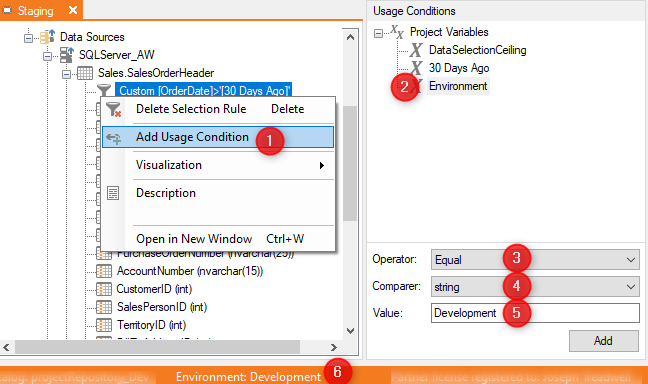
- Right-click on the Data Selection Rule > Add Usage Condition
- In the Usage Condition pane on the right, select the "Environment" Project Variable created earlier.
- Be sure the Operator = Equal
- Comparer = string
- In the Value text box, type the exact name of the Environment in which you wish to use the Selection Rule.
- You can read the exact name of the current environment in the status bar at the bottom of Discovery Hub.
Finally, click Add, to add the usage condition. The final result should look like this:
Additional Information
For a more advanced topic using similar concepts, see How to configure segmented table executions


2 Comments