Multiple Environments
With multiple environments, you can have a dedicated development environment with automatic transfer of the latest version of your project to the production environment. This ensures that the production environment is always online and available for end-users.
A dedicated development environment enables you to work within non-production environments. This is useful when an organization needs to ensure that the production environment is always available for end-users. For example, the organization could have an environment called "Development" where changes are made, dimensions are updated, and measures are created. Once these modifications are tested, they can be transferred to the live production environment directly from TimeXtender.
Prerequisites
Before setting up development environments, ensure that the following prerequisites are met:
- All servers used in the development and production environments must have the same version of TimeXtender installed.
- Ensure that TimeXtender service is installed and started on the server(s) you want to deploy on. Detailed instructions are provided below.
- Ensure that a project repository has been created on all the servers that are used in the production environment and development environment.
- The user account(s) that will be used to set up the multiple environments may need to have Read permissions to the Event Log. This can be set up in the Registry Editor under the “HKEY_LOCAL_MACHINE\SYSTEM\CurrentControlSet\services\eventlog” node. You can right-click the “eventlog” node, select Permissions, and add the users that will utilize Multiple Environment Deployment and assign them “Read” permissions.
Setting Up a Development Environment
The following example shows multiple environments using a single Development server and a single Production server.
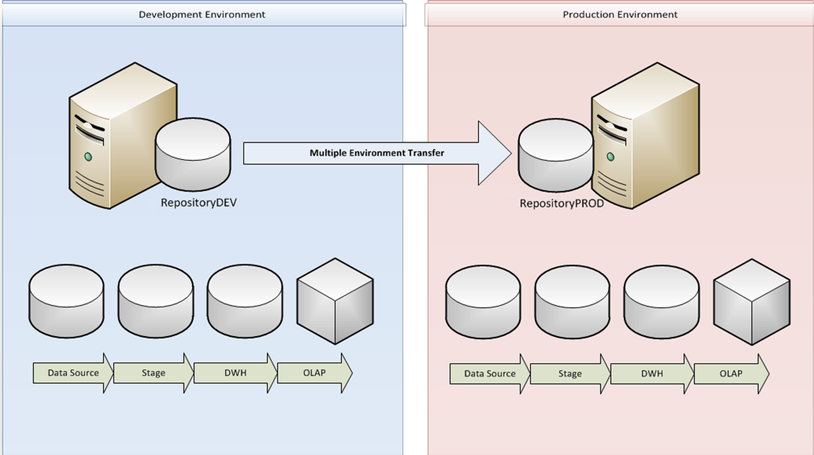
Note: You can set up as many environments as you need. Setup of additional environments follows the same steps as listed below.
Setting Up the Production Server
The first step is to set up the Production environment on the production server.
- Log on to the production server and open TimeXtender.
- On the Tools menu, click Environment Properties
- The Environment Properties window will open. Click New Environment.
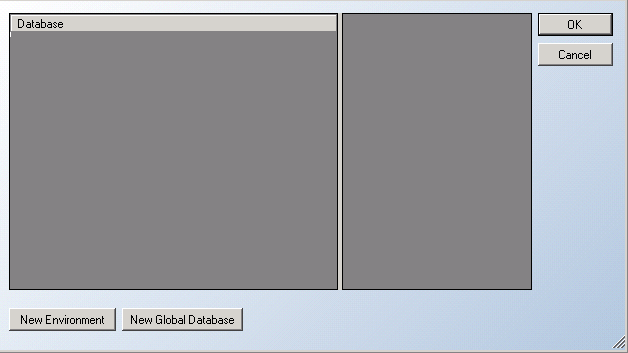
- The Add Environment window will open:
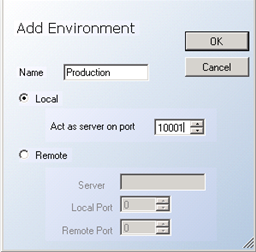
- Type a Name. In this example, the name is “Production”.
- Select Local, as deployment will only be done into this environment and not from it.
- Enter a port to use in the Act As Server On Port box. Make sure the port is free to avoid any conflicts on the network.
- Close TimeXtender.
- Next you need to make sure that the TimeXtender server service is correctly set up. Click/right-click Start, click Run, type Services.msc and click OK. Locate the server service in the list. It will be named TimeXtender Server [version].
- Right click the service and click Properties.
- On the General tab, in the Startup type list, click Automatic.

- On the Log On tab, click This account. In This Account, enter the account that was used for setting up the production environment, i.e. the account you are logged in with. Type the password for the account in the Password and Confirm password boxes. Click OK.
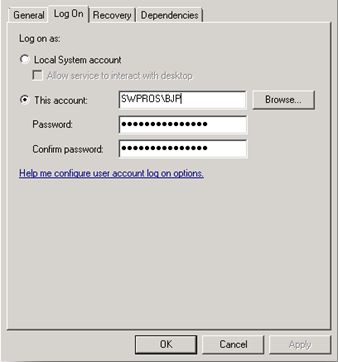
- Right click the service in the list an click Start.
- Log off from the production server.
Setting Up the Development Server
The next step is to set up the development environment on the development server.
- Log on to the development server and open TimeXtender.
- On the Tools menu, click Environment Properties
- The Environment Properties window will open. Click New Environment to create the development environment.
- The Add Environment window will open:
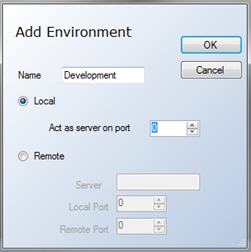
- Type a Name. In this example, the name is “Development”.
- Select Local, leave Act as Server on Port set to 0 and click OK.
- Click New Environment again to specify the production environment on the development server. This is so that the development environment knows where the production environment exists.
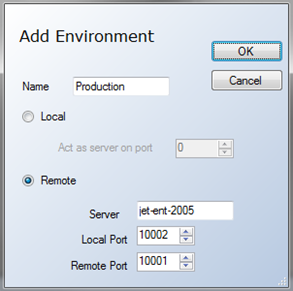
- Type a Name.
- Click Remote and fill in the remote server information:
- Server: Type the server name or IP address of the production server.
- Local Port: Enter any open port that is not being used by another application.
- Remote Port:Enter the port you selected when setting up the production environment on the production server.
- Click OK.
Creating Global Databases
Global databases allow TimeXtender to know where the related databases reside for the Production and Development environments. For example, the location of the Staging Database for both the Production and Development environments will be specified.
- Click New Global Database from the Environment Dialog window. The Add Global Setting window appears.
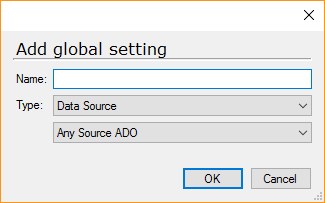
- Using this window, you will be creating a series of databases that will be used in your project. You will create the following global databases:
- Data source
- Staging database
- Data warehouse
- SSAS Multidimensional
- Assign a name to your data source, select Data Source in the Type section and select the relevant Provider Type. In this example, we will name our global database “GlobalDataSource” and use a provider type of Microsoft SQL.
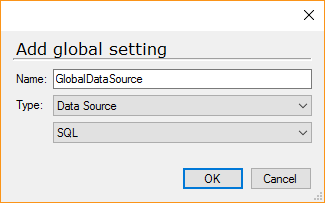
- Repeat the previous step for all databases in the project (staging, data warehouse, and SSAS Multidimensional).
Your results should look similar to those shown below: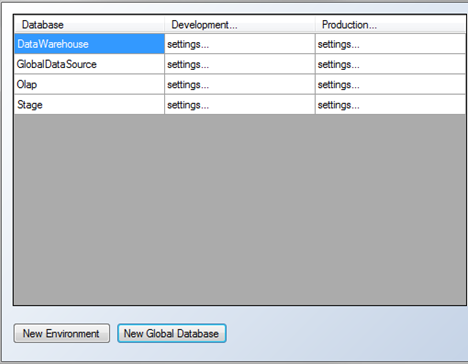
Configuring Global Databases
Within the EnvironmentPropertywindow you should have a data source, data warehouse, SSAS Multidimensional, and staging database. Each environment, Development and Production, has a “Settings..." section for each database. You can also click the environment name to access additional settings.

Configuring the Data Source
- Select the “Settings…” field from the data source row in the Development column from the Environment Properties window. This will display the Settings pane to the right.
- Enter the following information:
- Server: This will be the server address of the development server. Since this is currently on the development server, this can be localhost or the name of the server.
- Name of the database from which data is extracted. This will be the name of the NAV, AX, GP, or other database. In our example, this is JetCorpDemo.
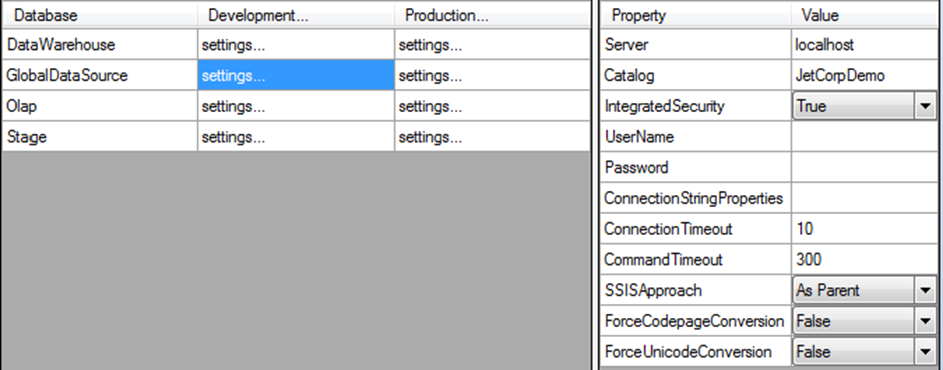
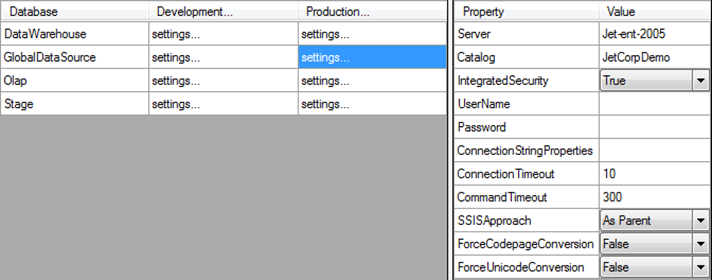
- Next click “Settings…" on the data source row in the Production column. Enter the following configuration:
- Server: This will be the name of the server on the Production Environment. In our example, the server name is jet-ent-2005.
- Catalog: This will be the name of the database from which data is extracted, for instance your ERP system. In our example, this is "JetCorpDemo".
Note: If you are using your live ERP database for extracting data in both the development and production environments, then the server name and catalog in both the Development and Production columns will be the same.
Configuring the Staging Database
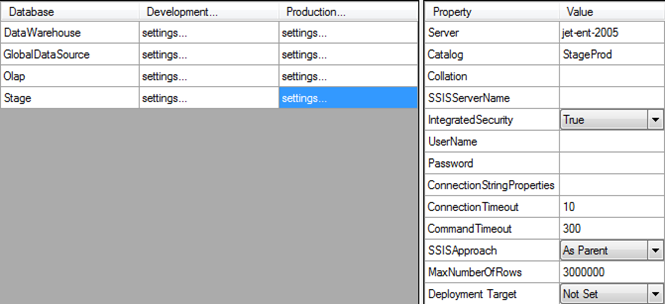
- Next you will need to configure another global database for the staging. Click "Settings…" on the Stage row in the Development column to display the Settings pane to the right.
- Enter the following configuration:
- Server: This will be the server address of the development server. In our example, this is localhost.
- Catalog: This will be the name associated with the staging database in the development environment. In our example, we use StageDev.
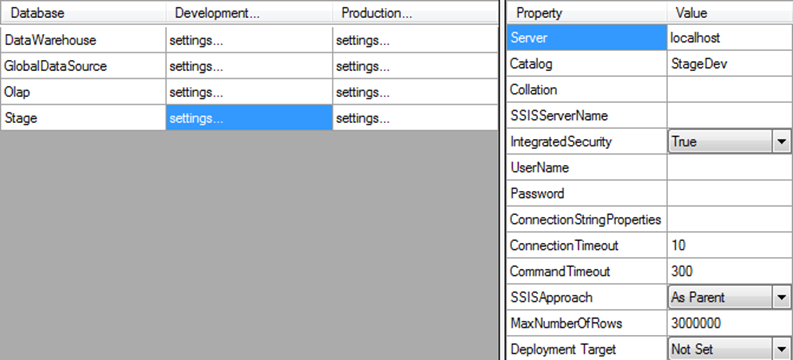
- Next click "Settings..." on the Stage row of the Production column.
- Enter the following configuration:
- Server: This will be the name of the server for the Production Environment. In our example, the server name is "jet-ent-2005".
- Catalog: This will be the name associated with your staging database in the production environment. In our example, we use StageProd.
Configuring the Data Warehouse
Next you will need to configure another global database for the data warehouse.
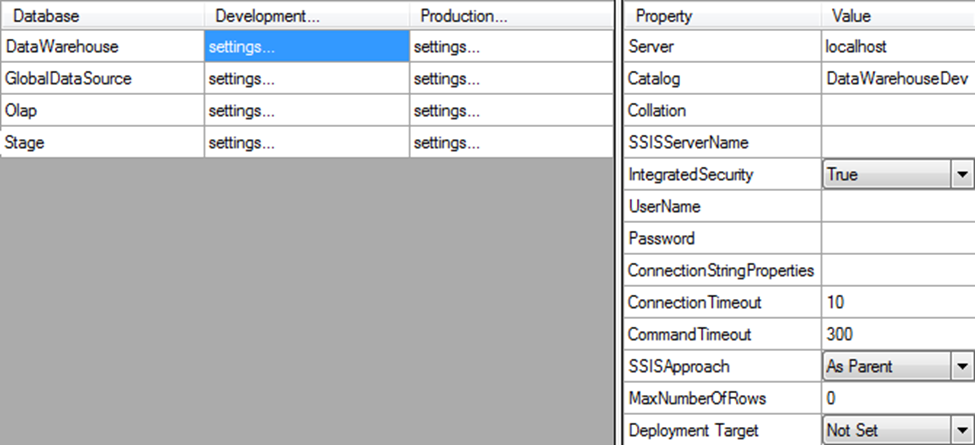
- Click "Settings...: on the data warehouse row in the Development column to display the Settings pane to the right.
- Enter the following configuration:
- Server: This will be the name of the server for the development environment. In our example, this is localhost.
- Catalog: This will be the name associated with your data warehouse in the development environment. In our example, we use DataWarehouseDev.
- Next Click “Settings..." on the data warehouse row of the Production column.
- Enter the following configuration:
- Server: This will be the name of the server for the Production Environment. In our example the server name is "jet-ent-2005".
- Catalog:This will be the name associated with your data warehouse in the production environment. In our example, we use "DataWarehouseDev".
Configuring the SSAS Multidimensional Database
Next you will need to configure another global database for the SSAS Multidimensional cubes.
- Click "Settings." on the SSAS Multidimensional row in the Development column to display the Settings pane to the right..
- Enter the following configuration:
- Server: This will be the server address of the development server. In our example, this is "localhost".
- Catalog:This will be the name associated with the SSAS Multidimensional database in the development environment. In our example, we use "OlapDev".

- Next, Click "Settings..." on the SSAS Multidimensional row of the Production column.
- Enter the following configuration:
- Server: This will be the name of the server for the Production Environment. In our example, the server name is "jet-ent-2005".
- Catalog:This will be the name associated with your SSAS Multidimensional database in the production environment. In our example, we use "OlapProd".

Creating the Global Databases
The final step in the configuration process is to test and create the global databases on SQL Server. This can be done from inside the Environmental Properties window. This needs to be done for both the development and production environments. Right-click "Settings..." and select Test Connection. If you get an error message, it generally means that the database has not been created yet. Right-click "Settings...", and select Create Database. Then retest the connection.

Perform this check on all Global Databases for both the Development and Production environments. Once this has been completed and all "Test Connection" responses return "Connection OK", click the OK button to close the Environment Properties window, and save all changes.
Note: The data source does not have the option to Create Database. This database represents the data source that TimeXtender is extracting from and will already exist in your infrastructure. An example of this will be your Dynamics Business Central (NAV), GP, or AX database.
Configure Project Connections
The environments have now been set up, and the global databases have been configured. The next step is to configure the connections in the project to utilize these Global Databases.
- Right-click the adapter and select Edit Microsoft SQL Provider.
Note: This will vary depending on your data source type.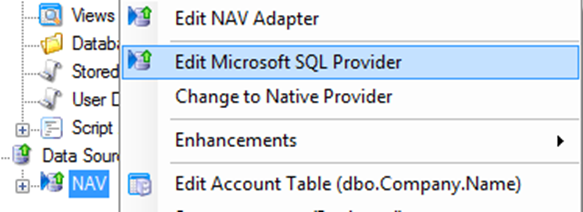
- Select Use Global Database for the data source, choose the global database that represents your data source, and click OK. There will generally be only one global database displayed in the drop-down list.

- Navigate to your staging database, right-click the database, and select Edit Staging Database.
- Select Use Global Database for the data source, choose the global database that represents your staging database, and click OK. There will generally be only one global database displayed in the drop-down list.
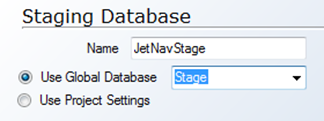
- Navigate to your Data warehouse, right-click the database, and select Edit Data Warehouse.

- Select Use Global Database for the data source, choose the Global Database that represents your data warehouse, and click There will generally be only one Global Database displayed in the drop-down list.
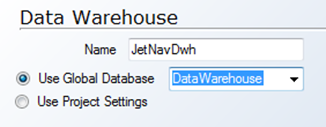
- Right-click the SSAS Multidimensional Database, and select Edit SSAS Multidimensional Server.
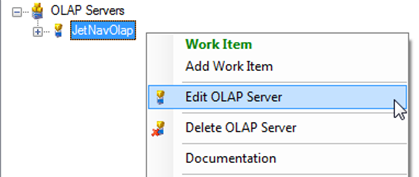
- Select Use Global Database for the data source, choose the global database that represents your SSAS Multidimensional database, and click OK. There will generally be only one Global Database displayed in the drop-down list.
- The final step is to deploy and execute the project to ensure your project is properly configured and ready for transfer. On the Tools menu, click Deploy and Execute Project and then click Start.
Transfer the Project from Development to Production
You are now ready to transfer the project from the development to the production environment.
- Log in to the Development Environment server, and open TimeXtender.
- On the Tools menu, click Multiple Environment Transfer.
- Click Transfer to migrate the project from the development server to the production server.
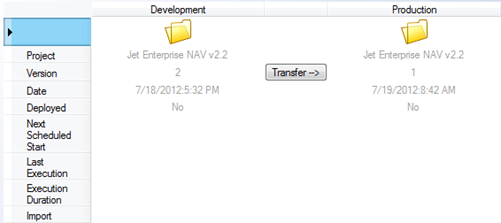
A dialog will appear asking you to confirm the transfer. Click OK. - Deploy the project on the production environment.
- If you are transferring the project from development to production for the first time, or if you simply want to deploy all objects, right click the Production Environment folder and click Deploy. When the Deployed line in the Production column changes to "Yes", the process has finished.
- If only some objects were changed in the development environment and are in need of deployment, right click the Production Environment folder and click Partial Deployment. The Remote Deployment Window opens. A list of deployable objects is displayed. Select the objects you want to deploy and click Deploy. While deployment is under way, the Partial Deploy window displays the deployment status. When deployment has finished, a window opens with a list of the deployment tasks completed. Click Close to close the window
- Click Close to close the Multiple Environment Transfer window.
Execution Packages
Execution packages will automatically update the staging database, data warehouse, and SSAS Multidimensional cubes on a scheduled basis. Since projects deployed from the development environment will replace packages in the production environment, it is recommended that the desired execution packages be set up in the development environment. This way, they are seamlessly transferred to the production environment with the package transfer. It may not be desirable to have automatic execution enabled in the development environment. This can be disabled by ensuring that the "TimeXtender Server Scheduler" service is disabled on the machine hosting the development environment. For more information regarding the configuration of execution packages, see Execution Packages.
0 Comments