Note: This article was originally written for TX DWA (older) version. However, the concepts may still apply to newer versions.
Data selection rules can be a powerful tool for controlling the flow of data into and through the BI environment. However, it can be difficult to understand how the function works, and what you need to do to get the results you want.
Data selection rule basics
TimeXtender data selection rules essentially allow you to write the WHERE clause of the SQL SELECT statement from the source table. These rules are inclusive - that is, you use them to define the characteristics of the records you want to move into the table. Another way of thinking about this is that you do not filter records out, you filter them in.
To demonstrate this, consider the following project:

The Foo table in the staging area has the following data:
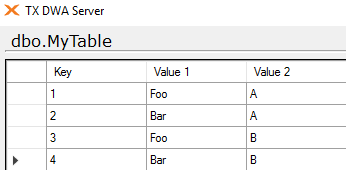
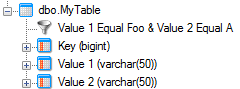
Note the data selection rule in the DWH table of "Value 1 Equal Foo." This restricts the data that enters the data warehouse table to records that have the value Foo in the column Value 1, as shown here:

Adding additional rules
It is possible to add more than one data selection rule on a given table. Depending how you add the rule, TimeXtender will interpret the rules using either logical conjunctions (AND) or logical disjunctions (OR).
Rules can be added using AND logic by creating two or more rules in a row, or by editing an existing rule and adding additional rules. The rules all appear on the same line separated by an ampersand (&):
TimeXtender uses an ampersand deliberately, as a custom selection rule may use the SQL operator AND. This allows the user to quickly and easily distinguish between a custom AND operator and a TimeXtender-generated AND operator.
To use OR logic, create one or more rules, then right-click on the table and create an additional rule. Rules that use OR logic will each appear on their own separate lines:

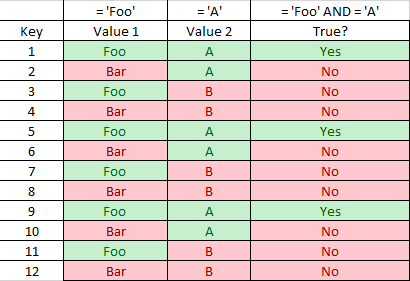
Results of using AND
Let's assume we're using the data selection rule example for AND shown in the preview section, where Value 1 = 'Foo' AND Value 2 = 'A'. Which values from the staging area table will show up in the data warehouse table?
To determine this, let's create a truth table. Remember that with AND, both the first condition and the second condition must be met for the record to be included. If one or both of the conditions is not met, the record will be excluded:

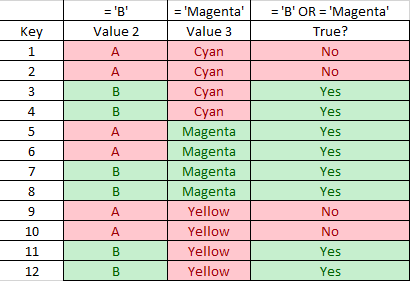
Results of using OR
Now let's have a look at the OR example, where the selection rule is Value 1 = 'Foo' OR Value 2 = 'A'. With OR logic, the record will be included if either of rules are satisfied. Only if both of the conditions are not met will the record be excluded:

Results of using both AND and OR
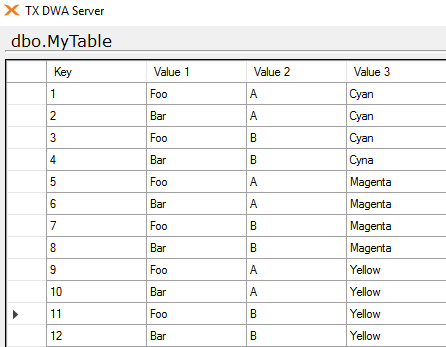
For this example, let's consider a slightly more complicated setup. We're going to add an additional column to our table, Value 3. The staging table now looks like this:
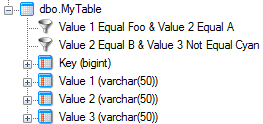
Let's create two sets of data selection rules. The first will be Value 1 = 'Foo' AND Value 2 = 'A', and the second will be Value 2 = 'B' AND Value 3 <> 'Cyan'. The data selection rules will look like this in the TimeXtender user interface:
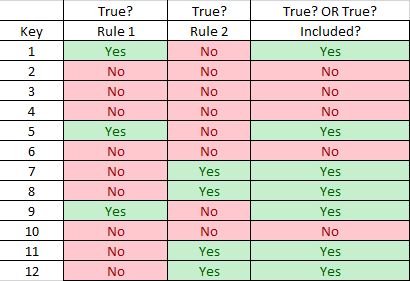
So how will these rules be evaluated? The answer is that each set of rules is calculated first, then each of the sets are compared to each other. The T-SQL syntax for this would be as follows:
([Value 1] = 'Foo' AND [Value 2] = 'A') OR ([Value 2] = 'B' AND [Value 3] <> 'Cyan')
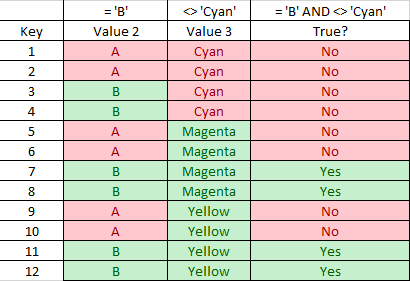
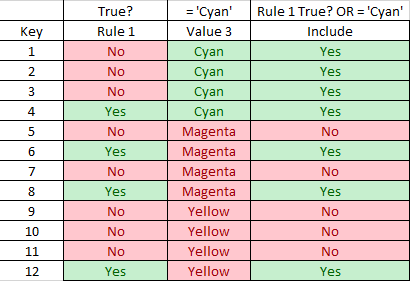
Let's look at the truth tables to determine which records will be moved into the data warehouse. First, we evaluate the first data selection rule:
Then, we evaluate the second data selection rule:
Finally, using OR logic, we compare the results of both rules. If either is true, the record is included:
Advanced grouping
The techniques we've covered so far work well if we only want to compare the results of selection rules that only use AND logic. What if we want to mix OR and AND logic in the same rule? In that case, we'll need to create a custom data selection rule.
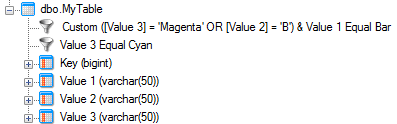
The rules we'll use for this example are as follows: we want to accept any record that where Value 3 equals Magenta or Value 2 equals 'B' and also must also have a Value 1 equal to "Bar". Besides those requirements, we'll also accept the record Value 3 = 'Cyan'.
In T-SQL, the condition would look like this:
(([Value 3] = 'Magenta' OR [Value 2] = 'B') AND [Value 1] = 'Bar') OR [Value 3] = 'Cyan'
The custom part of this is the OR logic between Value 3 and Value 2. The rest of the data selection rule can be created using only native TimeXtender functionality. The finished version of this selection rule would look something like this:
Finally, let's see what records will move into the data warehouse. First, we consider the OR statement in the first data selection rule.
Then, we compare the OR statement's result to the data in Value 1, which must equal BAR for the rule to be true:

We then compare the first data selection rule to the second data selection rule using OR logic, as shown below:
0 Comments