Note: There is an updated version of this article, which applies to the next generation of TimeXtender.
This guide will walk you through the steps of setting up TimeXtender, for the first time.
NB: If you are upgrading from a previous version, please see here: Upgrading TimeXtender from a previous version
Prior to Installation, be sure you have properly configured the TimeXtender Prerequisites and the User Accounts and Permissions.
- Download & Install TimeXtender
- Activate TimeXtender
- Import Settings from Previous Installation
- Connect to an ODX Server
- Set Up Repository
Download & Install TimeXtender
- Download TimeXtender.
- When the file has been downloaded, unzip the installation package and run Setup.exe.

- On the Choose Setup Type page, select your desired option. Typical and Complete will install both the TimeXtender Scheduler (for scheduled execution) and Server service (for multiple-environments). Use Custom and select "do not install" if you do not need these services, you can always add them later.

Connect to an ODX Server
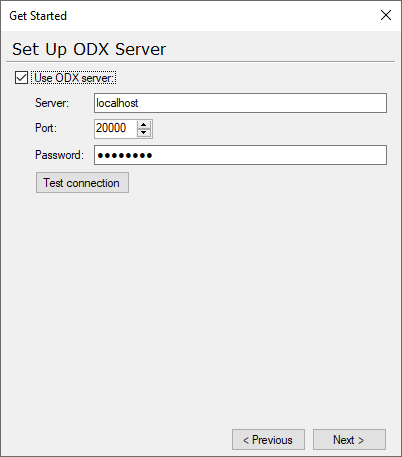
Next, TimeXtender will give you the option to connect to an existing ODX Server service. The ODX Server is not required, however, it is recommended if you plan to maintain a large collection of raw data such as a Data Lake of Operational Data Store. You can leave this setting unchecked and add it at a later time. Or you can Configure the ODX Server now.
- To connect to an ODX Server, check the box and specify the machine name/IP Adress of the server where you installed the ODX Server.
- Define, the Port Number.
- Enter the TimeXtender connection password you created when you installed the ODX Server.

Activate TimeXtender
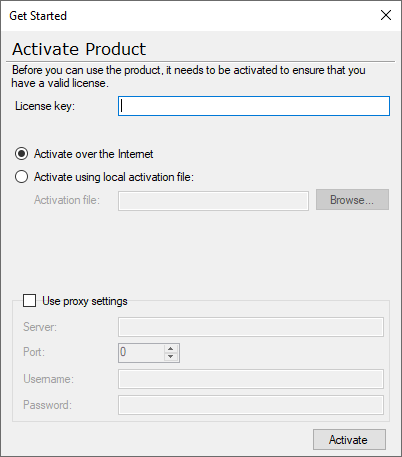
- When you first launch TimeXtender, you will be presented with the Activate Product dialogue.

- Enter your valid TimeXtender License key. You may find your TimeXtender license key in the TimeXtender Portal. If you do not yet have access to the portal, or do not have license key you may request one from your TimeXtender partner or other TimeXtender representative.
- Alternatively, you can create a trial license by clicking Sign Up on the sign in page of the portal.
- If your application server does not have access to the internet, you may select activate using a local activation file. You can download an offline activation file by navigating to your product license in the TimeXtender Portal and click Download activation file. If this option is not available, send a request along with your active license key and the current version of TimeXtender to support@timextender.com.
- If your server is located behind a proxy server you can add the credentials here, by checking Use proxy settings and entering the desired proxy server information.
- Finally, Click Activate to activate the software.
Set Up Repository
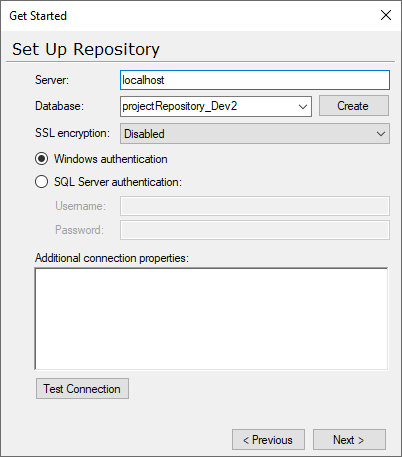
To create & manage projects, TimeXtender will need to create a new (or connect to an existing) project repository database. This is a SQL Database that contains all the metadata for your TimeXtender projects. The project repository database MUST be created from the TimeXtender application window. Be sure that the user who performs the following actions has the necessary permissions to create databases in the SQL server.
- Specify the SQL Server where the project repository should be located.

- Indicate the project repository database
- If you are installing new, enter the desired project repository database name and click create.
- If you are upgrading, click the drop-down and select the desired repository database you would like to upgrade.
- Define the Encryption method, SQL Server authentication method, and any additional connection properties.
- Click Next.
Note: Now that you have created your repository database we highly recommend you configure nightly backups of this database from within SQL Server.
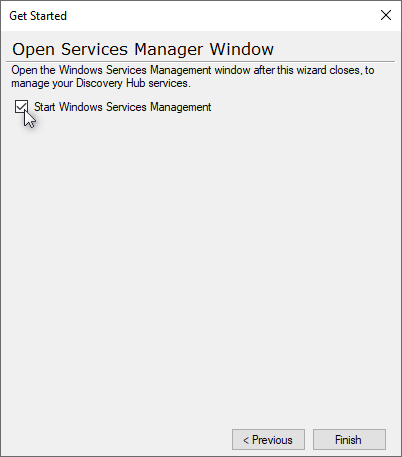
Lastly, once the repository database is successfully connected, TimeXtender will ask if you want to open the Windows Services Management window.

If you'd like to Configure the TimeXtender Scheduler Service now, you can check the box, or, just click Finish to close the wizard and begin using TimeXtender.
2 Comments