Building Qlik Models
Warning: The Qlik Modeler has been deprecated. We recommend using the Shared Semantic Layer for building Qlik models.
The Qlik Modeler in TimeXtender creates data structures that can be used by both QlikView and Qlik Sense. For Qlik Sense, TimeXtender can create an app directly in Qlik Sense Desktop and deploy an app to Qlik Sense Enterprise. For QlikView, the script generated by TimeXtender can be imported or included in the application.
Building a Qlik Model
Adding a Qlik Model
To add a new Qlik model, follow the steps below.
- In the Solution Explorer, right click Semantic Layer and click Add Qlik model. The Add Click Model window appears.
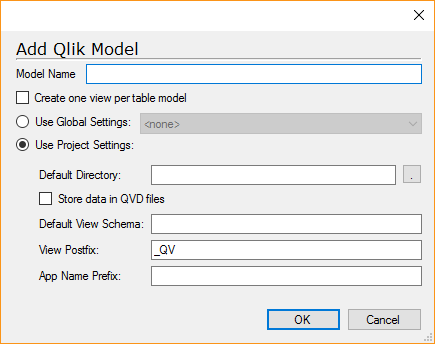
- In the Model name box, type a name for the model.
- In the Default directory box, enter the directory where you would like to store the generated Qlik script files.
- Select Store data in QVD files if you would like to store the retrieved data in QVD files for later reuse by the Qlik apps.
Note: If you want to deploy and execute to Qlik Sense Enterprise, using QVD files require additional setup. You also need to make sure that the Default directory path can be reached by the Qlik Sense server. See Deploying to Qlik Sense Enterprise for more information. - (Optional) In the Default view schema box, type a schema name if you would like the view generated by the Qlik Adapter to belong to a special schema for an easier overview.
- (Optional) In the View postfix box, type a postfix for the generated views. Default is “_QV” (for “Qlik Valid”).
- Select Create one view per table model if you would like TimeXtender to generate one view per table model in your solution, even if the same table with the same fields selected is used multiple times. The default behavior is to create one view per unique table model. This means that if two table models have the same fields, TimeXtender will only create one view.
- Click OK.
Cloning a Qlik Model
Instead of creating a Qlik model from scratch, you can clone an existing Qlik model to create a new Qlik model that is identical to the one it was cloned from. Naturally, this is useful if you need to create a Qlik model that is very similar to an existing Qlik model.
- To clone a Qlik model, right click the model, click Advanced and click Clone Qlik model.
Adding a Qlik Model Translation
Each Qlik model can have a number of translations that you can use for internationalizing your solution. You need at least one translation, so when you create a Qlik model, TimeXtender will automatically create a translation for you. Translations are more than just your data labeled in a different language, however. Deployment of a Qlik Model is also done on the translation level.
Translations can be found under Model Translations under each Qlik model. To create a new translation, follow the steps below.
- Right click Model Translations under the relevant Qlik model and click Setup Qlik Model Translations. The Qlik Model Translations window appears.
- Click Add Translation. The Add Translation window appears.
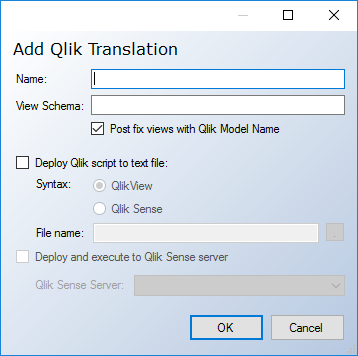
- In the Name box, type a name for the translation, for instance the language of the translation.
- (Optional) In View Schema, type a name for the schema the related views should use.
- Clear Post fix views with Qlik model name, if you do not want TimeXtender to postfix the views with the model name. This is not recommended since it means that some views might end up with the same name. In that case, that last view to be deployed will be the only view there is of that name.
- Select Deploy Script to Text file if you want to output the generated Qlik script to a text file. Under Syntax, make sure that the application, you will be using the script with, is selected. Type a path and name for the file in the File name box.
Note: If you want to deploy and execute to Qlik Sense Enterprise, you need to make sure that the File name path can be reached by the Qlik Sense server. - Select Deploy and execute to Qlik Sense server and select a server in the Qlik Sense server list to deploy the Qlik model to Qlik Sense Enterprise.
- Click OK. The Add Translations window closes and a new column is added in the Qlik Model Translations window.
- Type the translated names in the column under the name of your newly created translation and click OK when you are done.
Adding A Qlik Table Model to a Model
A Qlik model should contain a number of table models. A table model is simply the term we use for a table that is part of a Qlik model. You can add the same table multiple times, for instance if your database contains a Sales table with both a Sell-to-customer and a Bill-to-customer. To add a table model, follow the steps below.
- Drag a table from a data warehouse or staging database to a Qlik model. The Add Qlik Table window appears.
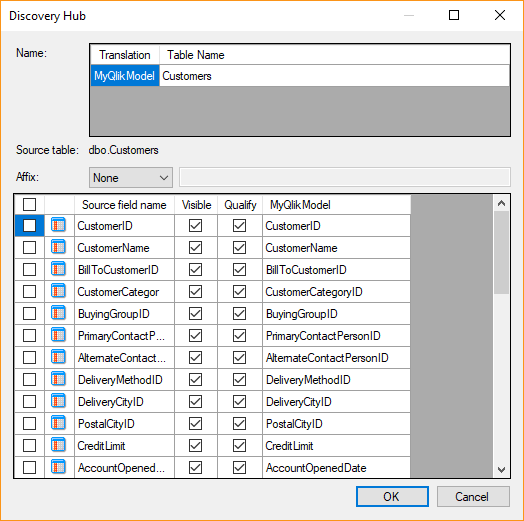
- In the Name list, click a name in the Table name row to rename the table for the translation listed in Translation column on the same row.
- Select the fields you want to include in your table.
- Clear the checkbox in the visible column if you do not want to show the field in QlikView/Qlik Sense, but need to include the field to e.g. create a relation.
- Clear the checkbox in the Qualify column if you do not want to qualify the table name.
- Each translation has a column. Click a name in that column to rename the field in that translation.
- If the Qlik model already contains other table models, the Setup Qlik Table Model Relations window appears.
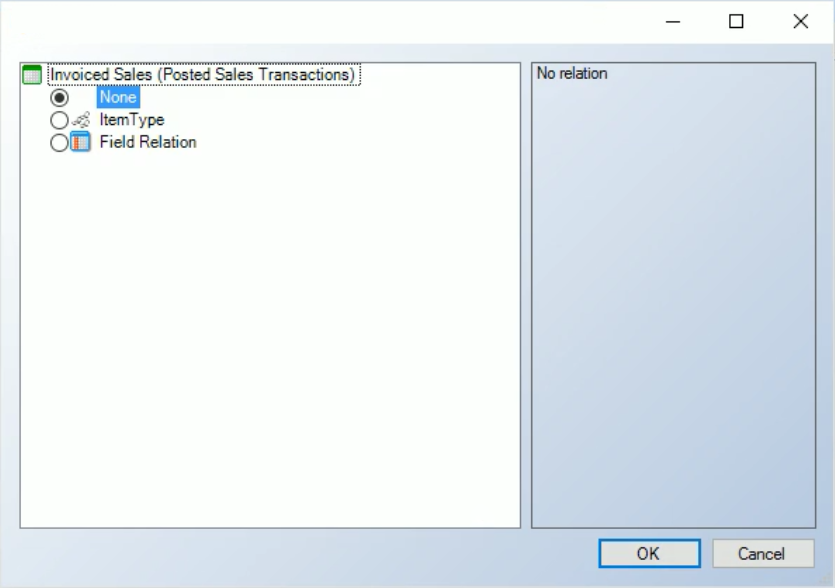
Here, you can set how the table you are adding is related to existing table models in the Qlik model. For each existing table model, you have the following options:- None: No relations to that table model.
- An existing relation defined in the data warehouse (recommended).
- Field relation: Relate using identical field names on both tables.
- Click OK.
Adding a Concatenated Qlik Table Model
A concatenated table is a table that combines data from multiple source tables. In QlikView or Qlik Sense, concatenated tables are useful for e.g. avoiding circular references. Concatenated tables can be created in the data warehouse, but creating them in the Qlik Modeler allows you to have one architecture in the data warehouse and another in Qlik without duplicating a lot of data.
To create a concatenated table model
- Drag a table from a data warehouse or staging database to an existing Qlik table model. A menu appears.

You have the following options:- Smart synchronize with table [table name]: TimeXtender looks on the other source tables on the Qlik table model and adds the fields from the source table that matches fields from the other source tables.
- Synchronize with table [table name]: Adds the fields of the source table to the Qlik table model.
- Synchronize with table [table name] (only existing fields): Adds the fields of the source table that have the same name as a field already on the Qlik table model.
Under Mappings, you can see the tables that delivers data to the table model. If you expand a field on the concatenated table model, you can see the fields from the tables that are mapped to that particular field.
You can also add new tables to a concatenated table model by dragging fields from a data warehouse or business unit opened in a new window to the Qlik table model.
- Expand the concatenated table model and drag fields from a data warehouse or business unit table to the fields on the concatenated table model. You will see that new fields are added under the table model fields and a new table is added under Mappings if the table was not already there.
When the Qlik model is deployed, the tables are set to be loaded in the order they appear under mappings.
- To switch the order in which the tables are loaded, click on a table under Mappings and press Alt + Up/Down to change the order.
Manually Relating Qlik Table Models
If you do not have any relations between table models defined in the data warehouse, you can add them manually. To add a new relation between two table models, follow the steps below.
- Navigate to the table model you want to relate to another table model.
- Click the field you want to base the relation on and then drag the field on a field on another table model.
- TimeXtender will ask you if you want to create a relation. Click Yes.
- (Optional) TimeXtender will manage the relation automatically and make sure that only the relations defined in the TimeXtender project will be used in Qlik. However, you can choose to an unmanaged approach to let the Qlik app create the relation. The Qlik behavior is to relate similarly named fields. To use this approach, right click on the newly created relation, point to Relation Type and click By name
Adding selection rules to a Qlik Table Model
Like tables on data sources and in data warehouses, Qlik table models support data selection rules. See Data Selection Rules for more information.
Renaming a Qlik Model, Model Translation or Table Model
It can be very useful to rename a Qlik table model, especially if you use the same table multiple times in your solution. In addition to table models, you can also rename Qlik models and model translations. To rename an object, follow the steps below.
- Locate the model, model translation or table model and click it.
- Press F2 to make the name editable.
- Type the new name for the object and press Enter.
The original name of the table model will be displayed in parenthesis after the name you type.
Debugging Relations with Plain Text Keys
TimeXtender utilizes concatenated key fields for creating relations between Qlik table models. For performance reasons, the value of these fields are hashed to create a value that uniquely identifies each record in the Qlik table model, but are shorter than the key would otherwise be.
For debugging purposes, it can be useful to see the values before the hashing is applied. In TimeXtender, that can be accomplished by changing the hashing algorithm. To change the hashing algorithm for a Qlik model to plain text
- Right click the Qlik model, click Hashing Algorithm and click Plain Text (Debug).
You can then preview the data in a Qlik application.
Since the plain text algorithm is very slow, remember to change the hashing algorithm back when you have finished debugging.
Scripting in Qlik Models
The Qlik Modeler is powerful, but sometimes there are things that call for code. Like other parts of TimeXtender, the Qlik Modeler contains features that enable you to write your own scripts to supplement the scripts generated by TimeXtender .
- You can use Qlik snippets to create reusable pieces of code.
- You can create custom Qlik fields, where you write the code that controls what the field will contain.
- You can use pre- and postscripts to add code before and after the code generated by TimeXtender respectively.
Adding a Qlik Snippet
Like SQL snippets on data warehouses and SSAS Multidimensional snippets on cubes, you can create Qlik snippets. These can be used in custom Qlik fields. See Snippets for more information.
Adding a Custom Qlik Field
Custom fields are fields where the value is calculated by a Qlik script that you write.
- To add a custom field, right click a table model, click Add Custom Qlik Field. The Add Custom Qlik Field window appears.
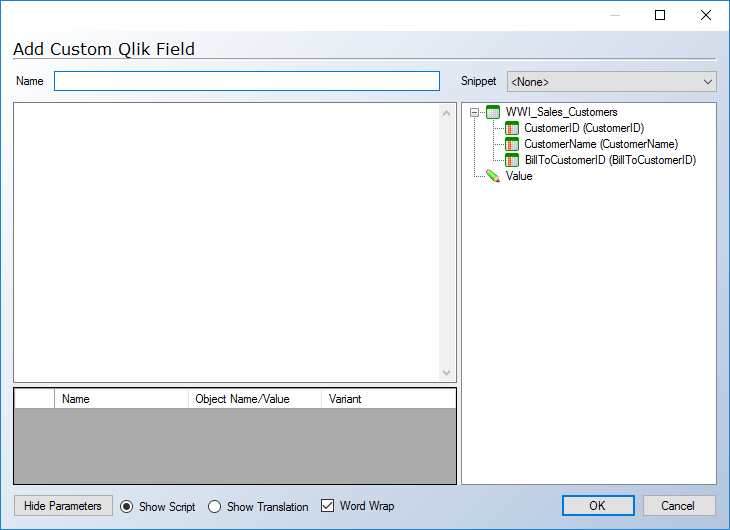
- Type a name for the custom field in the Name box.
- If you want to use a Qlik snippet in your custom field, click on the Qlik snippet you want to use in the Snippet list.
- Enter your script in the main text box. You can drag in fields from the list to the right to use in your script. Drag in "Value" to create your own custom variable.
- Click OK to save the script.
Adding Pre- and Postscripts
TimeXtender generates the code the creates the Qlik model you build in the Qlik modeler. You can supplement that code with pre- and postscripts that are added before or after the generated code.
- Right click Prescripts, click Add Snippet Prescript and click the snippet you want to use.
- OR -
Right click Postscript, click Add Snippet Postscript and click the snippet you want to use. - Type a name for the script in the Name box.
- In the main text area, enter the code for the Qlik snippet. You can drag in tables, fields, and project variables from the list to the right to use in your function/procedure. Drag in "Value" to create your own custom variable.
- Click OK to save the script.
Adding Pre- and Postscripts based on a Qlik Snippet
In addition to writing it from scratch, you can add a pre- or postscript based on a Qlik Snippet.
- Right click Prescripts and click Add Prescript
- OR -
Right click Postscriptand click Add Postscript - Type a name for the script in the Name box.
- In the window that appears, map the available fields to the parameters in the snippet. Drag the field(s) from the list on the right and drop the field on the Object Name/Value column for the relevant variable. The Object Name/Value column and Variant column will populate automatically.
- Click OK to save the script.
Adding a Custom Format Section
The custom format section - you can only have one - is added as a separate script before the script containing prescripts, postscripts and the script generated by TimeXtender. To keep things tidy in the Qlik application, any default formatting settings you want to override should be added to this script.
- To add a formatting script, right click Script, click Add Custom Format Section, type a name for the script in the Name box, type your script in the main text area and click OK.
Deploying and Executing Qlik Models
Just like data warehouses, Qlik models needs to be deployed before you can use them in QlikView/Qlik Sense. Deployment generates the script that can be used in one of the Qlik applications. You can deploy a Qlik model, which deploys all underlying Qlik model translations, or the individual Qlik model translation.
- To deploy a Qlik model or Qlik model translation, right click it and click Deploy.
Depending on the Qlik application you are targeting and your setup, there are different ways to deploy and get data into the Qlik application:
- Deploy the Qlik model and copy and paste the Qlik script from TimeXtender to the Qlik application.
- Deploy the Qlik script to a text file and set up the Qlik application to read the file.
- Deploy to Qlik Sense Desktop. TimeXtender can create an Qlik Sense app and load the data.
- Deploy to a Qlik Sense Enterprise server. TimeXtender can create a Qlik Sense app and execute the Qlik Sense app to load data.
Reviewing Scripts and Deploying to Qlik with Copy and Paste
You can always view the latest script generated for a Qlik model or Qlik model translation. To get the model into your Qlik application, you can copy the script and paste it to your Qlik application.
- To review the scripts generated by TimeXtender, right click a Qlik model translation and click Qlik Sense App script or QlikView Scripts.
Deploying to a Text File
To set up a Qlik model translation to deploy to a text file, follow the steps below.
- Right click on the Qlik model translation and click Edit Translation. The Edit Translation window appears.
- Select Deploy Qlik script to text file.
- Under Syntax, make sure that the application you will be using the script with, is selected.
- Type a path and name for the file in the File name box.
- Click OK.
Deploying to Qlik Sense Desktop
TimeXtender can create a Qlik Sense app and make it available in Qlik Sense Desktop. To create a Qlik Sense app based on a Qlik model, follow the steps below.
- Deploy the Qlik model translation if you have not already done so.
- Right click the relevant Qlik model translation and click Create Qlik Sense App. The Create Qlik Sense App window appears.
- In App name, type a name for the app.
- Click Create. TimeXtender will start Qlik Sense. If an app with the same name already exists, TimeXtender will ask you if you want to update the app.
- When the app has been successfully created or updated, TimeXtender will ask you if you want to load data.
- Lastly, TimeXtender will ask you if you would like to close Qlik Sense.
Deploying to Qlik Sense Enterprise
TimeXtender can deploy a Qlik Sense app to Qlik Sense Enterprise and make the app update data each time the project is executed. The setup consists of the following steps:
- Add a Qlik Sense Enterprise server to TimeXtender.
- Set up the Qlik model translation to deploy to the server.
- (Optional) Configure TimeXtender to save data as QVD files and Qlik Sense Enterprise to use these files.
Note: The Qlik Sense Server needs to be able to connect to the SQL Server that contains the data used in the Qlik model. Each staging database or data warehouse database that contain tables used in the Qlik model should have the server name set to a publicly accessible IP. If you use Windows authentication, the user running the Qlik services needs access to database.
To add a Qlik Sense Enterprise server, follow the steps below.
- In the Solution Explorer, right click Semantic Layer and click Add Qlik Sense Server. The Add Qlik Sense Server window appears.
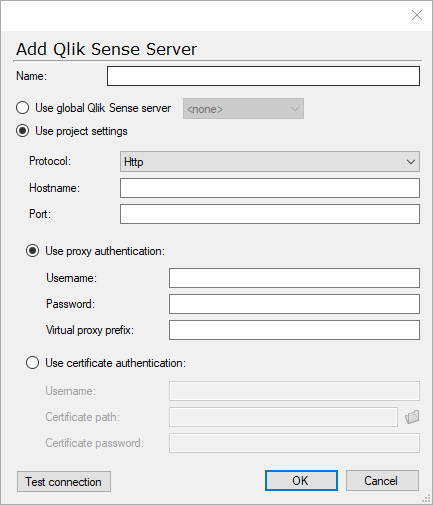
- Type a name for the server in the Name box.
- In the Protocol list, click the protocol you want to use.
- Type the your server's hostname in the Hostname box.
- Type the port to connect to in the Port box if it is different from the default. The defaults are 4747 if you use certificate authentication, 80 if you use proxy authentication with HTTP and 443 if you use proxy authentication with HTTPS.
- Click Use proxy authentication if you are using the proxy authentication method to authenticate with the Qlik Sense Enterprise server. Type your username in the Username box and your password in the Password box. Write the prefix from the virtual proxy in Qlik Sense in the Virtual Proxy Prefix box.
- Click Use certificate authentication if you are using the certificate authentication method for authenticating with Qlik. Type your username in the Username box, enter the path to the certificate in the Certificate path box and the associated password in the Certificate password box.
- (Optional) Click Test Connection to verify that the connection settings you have specified are working.
- Click OK to add the Qlik Sense Enterprise server.
For more information about adding a virtual proxy to Qlik Sense Enterprise or exporting a certificate for use in TimeXtender, please see the Qlik Sense documentation.
To set up a Qlik Model Translation to deploy to Qlik Sense Enterprise, follow the steps below.
- Right click on the Qlik model translation and click Edit Translation. The Edit Translation window appears.
- Select Deploy and execute to Qlik Sense server.
- Select a server to deploy to in the Qlik Sense server list.
- Click OK.
To set up Qlik Sense Enterprise to be able to save data from TimeXtender as QVD files, follow the steps below:
- Right click on the Qlik model and click on Edit Qlik Model. The Edit Qlik Model window appears.
- Select Store data in QVD files and click OK.
- If the Qlik model translation has not been deployed before, right click on it and click Deploy. The deployment will fail since the QVD files cannot be created, but it will create an app on the Qlik Sense Enterprise server.
- Open Qlik Sense in your browser, open your Qlik Sense App, and click Data Load Editor to go to the data load editor.
- Click Create New Connection and then click on Folder. Choose a folder on your machine. In the Name box, type "File Storage <Qlik model translation name>", where <Qlik model translation name> is the name of the Qlik Model translation you are deploying. Click Create.
- Go to the Qlik Sense management console and click Data Connections. In the list, click on the data connection you just created to open it. In the Name box, delete the text in the brackets, so the name is simply "File Storage <Qlik model translation name>". Click Apply.
- You should now be able to deploy your Qlik model translation without errors.
With the setup complete, you are ready to deploy and execute. The deployment generates the script and pushes the app to the server, while execute makes the app load new data.
- To deploy and execute all Qlik models in your project, right click the Qlik root node and click Deploy and Execute.
- To deploy and execute a Qlik model, right click the Qlik model and click Deploy and Execute.
- To deploy and execute a Qlik model translation, right click the Qlik model translation and click Deploy and Execute.
Warning: When a Qlik Sense app is deployed to a server, a data connection is created. This connection uses the names of the staging databases and data warehouses in the project. If you have another project that deploys to the same Qlik Sense Enterprise server, the names for these objects in this project have to be different to avoid overrides.
0 Comments