Text File Data Source
One of the simplest ways to transfer data between systems is through the use of text files. For instance, some industrial equipment produce log files in text format that can be used as a data source in TimeXtender to include productivity data in the data warehouse.
One text file data source corresponds to one table in TimeXtender . You can load a single text file or multiple identically formatted text files.
Adding a Text File Data Source
While virtually identical, you have to choose between the Single Text File and Multiple Text File data sources when you set up a text file data source. The Multiple Text File data source is usually preferable even if you only have one text file since it enables you to add more text files as sources should you need it sometime in the future. To add a text file data source, follow the steps below:
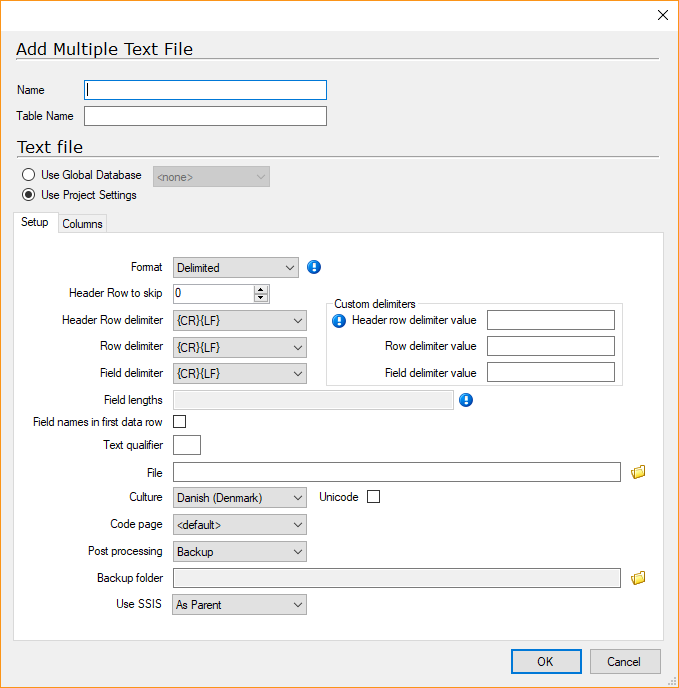
- Open a business unit, right click Data Sources, click Data Sources and then click Add Multiple Text File data source/ Add Single Text File data source. The Add Multiple Text File or Add Single Text File window appears.

- In the Name box, type a name for the data source.
- In the Table Name box, type the name of the table that is created in the staging database. The table is prefixed with the data source name. If you want to set your own prefix, clear Auto Prefix Tables and type the prefix you want to use in Manual Table Prefix box.
- (Optional) Click you preferred option in the Transfer Failure Option list to change the Allow Failing Data Source setting.
- In the Format list, click the format of the text file, e.g. how TimeXtender should make sense of the content of the file.
- Select Delimited if rows and fields are separated by a character and click the relevant characters in the Header Row delimiter, Row delimiter and Field delimiter lists.
- Select FixedWidth if the fields have a fixed length and type the lengths in Field lengths in a semicolon-separated format, e.g. "2;4;8;3".
- Select RaggedRight if the last fields is delimited by a character, while the previous fields are fixed width. Click the relevant characters in the Header Row delimiter, Row delimiter lists and type the lengths in Field lengths in a semicolon-separated format, e.g. "2;4;8;3".
- Select Field names in first data row if the first row of data contains field name, i.e. not data.
- Type a Text Qualifier, often a quotation mark, if you would like TimeXtender to strip from the fields before loading data into the staging data base.
- If you are adding a multiple text files data source, enter the path to the files you want to process separated by semicolon (;) in the File box. You can also use wildcards. Use "*" for any number of characters and "?" for a single character. You can also click the folder icon next to the File box to choose the file to process.
- OR -
If you are adding a single text file data source, click the folder icon next to the File box to choose the file to process. - In the Culture list, click the language of the text file.
- In the Code page list, click the codepage of the text file.
- Select Unicode if TimeXtender should treat your file as Unicode.
- In the Post processing list, click the action you want TimeXtender to perform when the file has been processes.
- Select Backup to move the file to a backup folder and click the folder icon next to the Backup folder field to select the folder.
- Select Delete to delete the file.
- Select None to leave the file as it is.
- In the Use Integration Services for transfer list, you can click Yes or No to change the setting from the default As Parent.
- Click the Columns tab and click Get Fieldsto load the fields, which will then be displayed in a list in the left-hand side of the window. You can select one or more fields in the list and adjust different settings for them:
- Column name
- Data type
- Text length: Enter the maximum number of characters in the field.
- Variable length: Select if you do not want the field to have a fixed length.
- Unicode: Select to convert data to Unicode
- Number of decimals: Enter the maximum number of decimals allowed in the field.
- (Optional) Select Retain null values to set the value of empty fields to the field's data type's default value instead of null.
- (Optional) Select Enable file column to add a column with the name of the source file to data.
- Click Update to show a preview of the data as TimeXtender understands it with the settings you have chosen. You have the option of adjusting the Number of rows to see more or less rows.
- Click OK to add the data source.
0 Comments